Wednesday 31 July 2019

Book marks - Marleen DT

Hi everyone
and welcome

My house is full of book worms. I have always been an avid reader myself but now I have 3 children who are all book worms too. Its currently summer holliday here in Ireland and should you by any chance take a walk through our house, you will find at least 2 people reading at any time of the day lol.. Anyway.. Many books on the go, means many book marks are needed. I always try to have a few extra lying but had run out so for todays post I decided to make a few.

So for todays project for  Colourific
I pulled out some tags and my stamps and got started..

For the boy tags I used:
A6 - grunge background
A6 - Alphabet & Numbers


And for the girls tags I used:
A6 - Moderne Flowers
A5 - Peonies

Find them in the STORE along with all the other amazing stamps.


***


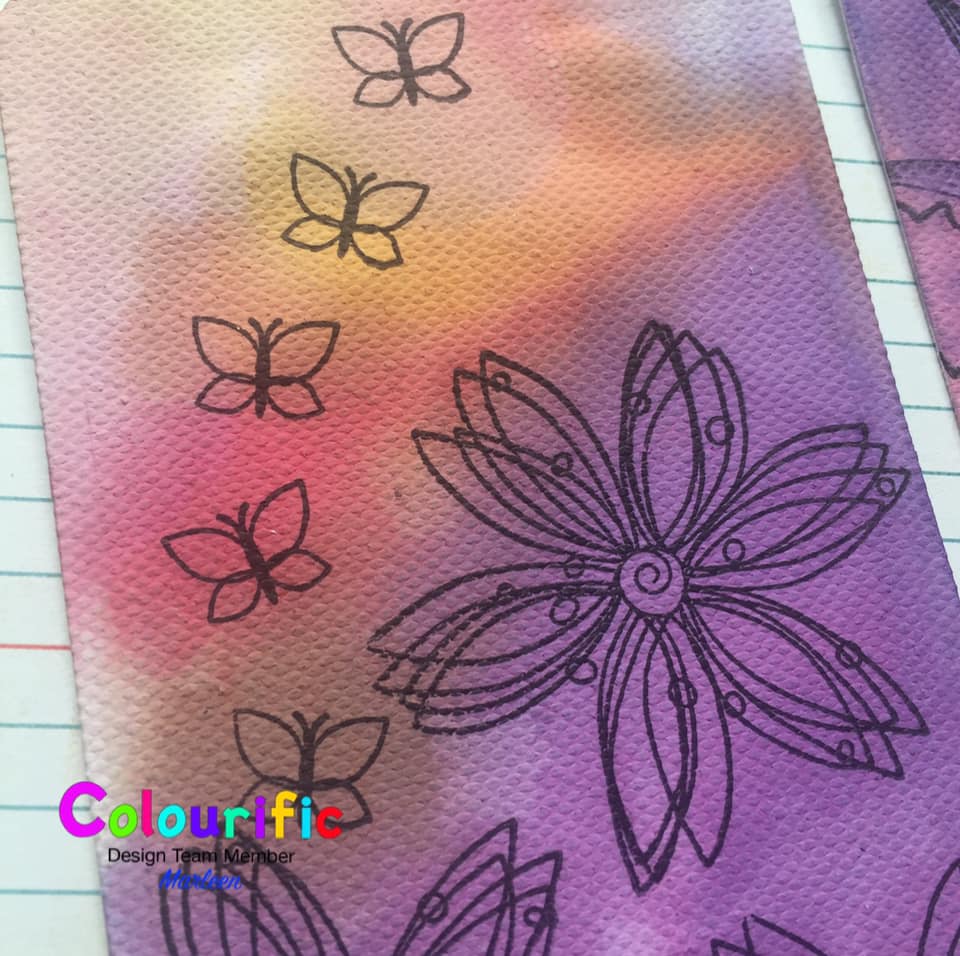
All the tags were made the same way.
I used tags I cut from canvas paper. (After they were finished and totally dry I layered them up on another tag cut from card stock to make them more sturdy) I used Distress Stains as my colouring and used a water brush to move the colour to where I wanted it.

I stamped using a variety of Archival inks as they are water proof and stayed in place as I moved the colour around.

The "read" on the boys tags, I stamped each letter onto a scrap piece of card stock and glued onto the tag individually.

Normally I would finish adding a piece of ribbon to the top of the tag, but my kids has asked me not too as they find it distort the books as they pile them up.. Their wish is my command eh lol

And that is it from me for today.
Thank you for popping by and for any comments left behind.
Don't forget to come visit me on FaceBook, Twitter, Instagram, Pinterest, Youtube or my FB page.
 Happy Crafting


Tuesday 30 July 2019

Chrysanthemum Canvas

Good Morning everyone..

Caz  here with some inspiration for you today..I decided to make a canvas this week..

These stamps are so versatile they can be used for anything..


What i have used

5x7 Canvas Board
Gesso
Nuvo Drops
Pebo paint and Promarkers

1st i coated board with Gesso paint..Then using a sponge, i sponged some yellow pebeo paint over that..
I then stamped flower stamps,  cut out, coloured with promarker  and glued to corners, as you can see and 1 small one.
Sentiment stamp is from my stash, stamped n cut out stuck on,,I also used a small wording background stamp, just to fill in a bit...Glossey accents in center of flowers, sprinkled with glitter..
Some nuvo drops in empty corners..Mmmm looking a bit drunk..lol..

Hope you like what you see.

Caz xxx


Monday 29 July 2019

Kaleidoscope Card - A6 Doily Kaleidoscope Stamp Set

Good Morning Everyone

Alice here with my last Monday Morning Blog for July.  Can't believe we are heading into August!  The A6 Doily Kaleidoscope clear stamp set was my challenge for this week.  What should I do with it?  Well, I had great fun playing with this stamp set from Colourific.  I have several samples to show you over the next few weeks.   You will find this and all of the stamps used on the Colourific Website here.


Materials:

A6 Doily Kaleidoscope Clear Stamp Set
A6 Flowers Marquis Petal and Circular Clear Stamp set
6x6 White Card Blank
6.75 x 6.75 Black Mat
6.5 x 6.5 White Stamping Card
Copic Markers
CC Sparkle Pen
Gems
Foam Pads

  • Stamped the Kaleidoscope with Memento Ink onto centre of 6.5 x 6.5 stamping card, then stamped around it with various stamps from the Marquis Petal and Circular stamps.
  • Used Copics to colour everything everything in,  Then went over parts of it with the Sparkle Pen.
  • Stamped out one of the Circle Stamps, fussy cut it out and mounted it onto centre of Kaleidoscope with a foam pad.
  • Used a Greeting Stamp from my stash and made the banner for the bottom of the card.  This has been mounted with foam pads onto a scrap of black card to give the card some dimension.
  • Finished off with some gems from my stash.

Hope you like it and thank you for looking.  Will be back again next week.


Sunday 28 July 2019

Paint Pot


Hello. It's Liz here today with something a little bit different! I've had this paint pot for at least five years so thought it was about time I did something with it! The pot is clear plastic and made for decorating but I guess you could use any old paint pot or tin. I simply covered the pot with patterned paper. Then I stamped two of the Moderne Flowers, coloured and carefully trimmed around. They were then fixed to the pot and lid using foam pads.


I then stamped out 'brushes' using the Alphabet and Numbers stamp set and cut them up in random shapes. They were also fixed to the pot using foam pads. I'm pretty pleased with how it turned out!


Friday 26 July 2019

Winter Wonderland Magnet

Fancy a change from making cards?  Here is an idea for a fridge magnet:

Here is what you need:

2.5" diameter MDF circle
White Stamping Card
Winter Wonderland Stamp Set
Versafine ink pad Onxy Black
Alcohol pens
White pen - I used a Uniball Signo
Clear or white Glitter
Dries Clear glue
Glass paper (sandpaper)
Clear varnish or Glossy Accents
Magnet

Here is what I did
  1. Stamp the image of the two deer's on a piece of stamping card and colour in using your favourite preferred colouring tools. 
  2. Underline the characters with glue and glitter to ground them and the border between the sky and snow.
  3. Glue onto the MDF circle and wait until it dries.
  4. Cut out around the circle leaving a millimetre overhanging, use the glass paper to smooth the edges. 
  5. Cover the image with a thin layer of varnish and let this dry.  Top Tip  - Don't try to do this on a hot day - I did and it was not happy!!!!
  6. Outline the edge with glue and glitter.
  7. Attach a magnet onto the back.  I cut some off a self adhesive roll.

Thursday 25 July 2019

When Stained Glass becomes a Flower ~ Colourific


Happy Thursday Everyone
This week I have had great fun playing with the stamp set
With a few snips here and there
I turned it into a flower!
How many possibilities with this Stamp set

I coloured up using Distress Ink refils  and using the same colours as I did for the flower did a few splashes for my card background

I also used stamp set
for the sentiment.

Be sure to pop over to the Colourific Store
there are some great prices on the stamp collections
&
Free UK postage if you spend over £5
where you could win some goodies
See You there


Wednesday 24 July 2019

Vintage Wedding - Marleen DT

Hi everyone

Its once again Wednesday and my turn to share a bit of inspiration using the stamps from
ColourificFor today's project I have used the stamp sets called
A5 - champagne & Cocktails
A5 - Vintage Car

Find them in the STORE along with all the other amazing stamps.


    A simple little card. A background made with an embossing folder and a vellum die cut heart, created the setting for my vintage car. I stamped the 'congratulations' from the 'champagne and cocktails' set, using an Archival ink strait on to the vellum and left to dry.

The car itself, I stamped onto watercolour card stock and coloured with water colour pencils. I cut masks from post-it-notes for both tyres and covered the rest of the car with clear embossing powder. I only gave it 1 coat but as I look at pics now I wish I would have done 2. I think it would have given it just that little bit more..

Anyway.. my number plate.. This is a nifty little on.. let me show you..

Do you see the number plate already ON the car?? It says 'Happy Birthday' but further down on the set there is an extra plate that says 'Wedding Day'. So you can change the plate on the car for more use. I love that. It just gives you more ways to use the set. I suppose if you have other mini stamps with greetings, you can block out the 'happy birthday' when you ink up the car and add other stamps there..

Anyway, I stamped out the wedding plate and fuzzy cut it and layer it up on my car.
I finished my little card with a few gems and a bit of sparkle pen on the number plate.

And that is it from me for today.
Thank you for popping by and for any comments left behind.

Don't forget to come visit me on FaceBook, Twitter, Instagram, Pinterest, Youtube or my FB page.
 Happy Crafting


Tuesday 23 July 2019

A6 Flower Kaleidoscope Stamp

Morning Caz here, is my turn to show some makes Ive made using the 


The first card I have made using 6x6 card..Layered with red n white card..I have stamped twice with 2 diffrent colours..  Hand cut these out and fixed together using butterfly pin...Black one will spin round..Attached stick to card, then placed cut out stamps on stick..Bit like pinwheel..Background stamp and sentiment from my stash.


2nd card again using 6x6 card and layered with black and white card stock...Stamp Ive stamped twice, filled in some bits of the flowers , one in red other black..Cut out and stuck to card oppisite corners...Sentiment from stash..


Im sure you will see more of these Kaleidoscopes in time in diffrent forms..So do look our for them..

Just click my name to be taken to my blog, for more detail..


Thank you for looking..

Caz

Monday 22 July 2019

Foiled Blossom - A6 Blossom and Grow Stamp Set

Hi All

Alice here with yet another Monday Morning Blog Post.  I had fun doing this on Kraft Card with the A6 Blossom and Grow and the A6 Leaves from Colourific.  You will find all of their stamps on the Colourific Website here.


Materials Used:

A6 Blossom and Grow Stamps
A6 Leaves
6x6 Kraft Card
5.75 x 5.75 Glitter Card
5.5 x 5.5 Kraft Card
Off cuts of Kraft Card and Glitter Card for Banner
Scrap piece of Velum
Gold Embossing Powder
Wow Bonding Powder
Versa Mark Stamp Pad
Greeting
Gold Gems
Gold Brads


  • I stamped the leaves onto the 5.5x5.5 square Kraft Card with Versa Mark Ink and embossed with Gold Embossing powder.  
  • Blossom Flower was stamped onto Kraft Card and Embossed with Wow Bonding Powder and then fed through Foiling Machine.  
  • Greeting was stamped onto velum and embossed with gold embossing powder.  The velum was torn to make it distressed. I made the banner with the scrap card and attached the velum sentiment with gold brads.
  • I layered the card up and then fussy cut the Blossom Flower and attached with foam pads.

Thank you for looking, see you next time 
Take Care


Sunday 21 July 2019

Happy Birthday


Hello, it's Liz here. Today my card features two different stamp sets, I like to mix and match! The flowers are from the Hydrangeas set and the leaves are from the Peonies set. I stamped everything onto watercolour card using my Versafine ink pad. I then coloured with distress markers, some water and a paint brush. I then fussy cut and attached to my card base using foam pads. 

Have you entered our challenge? It's anything goes so that's nice and easy isn't it? There's a gorgeous stamp set up for one lucky winner. All the details you need are here.

Saturday 20 July 2019

Inked Blossom - A6 Blossom Stamp Set

Hi Everyone

Alice here.  Welcome to my blog post for today.  I have used the A5 Blossom and Grow Stamp set again.  You can find this and many more fabulous stamps on the Colourific Website here

Materials Used:

A6 Blossom and Grow Stamp Set
A6 Borders Stamps
6x6 Card Blank
5.75 x 5.76 Light Blue Card
5.5 x 5.5 Pink Card
5.25 x 5.25 White Card
Black Embossing Powder
Black Versa fine Ink Pad
Blue and Pink Watercolours


  • Matted and layered Light Blue and Pink cards onto with card blank
  • Lightly sprayed the White Mat with Water and added pink and blue water colours.  Sprayed again with water and let paint run over the card.  Left to dry naturally.
  • Stamped the Blossom onto the card and added the little stamps and stems at the bottom, then embossed with Black Powder.  Then added pink watercolour to the blossom head.
  • Added the Border stamp along the top and left hand side.
  • Stamped Blossom and Grow greeting in the bottom left hand corner.
  • Finished off with 3 gems.

Thank you for looking


Friday 19 July 2019

Multicoloured Hibiscus

Hi everybody,

It's Friday, so It's my turn to show you all a card.  I used the A5 Hibiscus stamp to make this card, I wanted something summery and colourful, so here is what I came up with:

What you will need:

A5 Hibiscus stamp from Colourific
Stamping card
A4 Burgundy card
Multicoloured embossing inks - I used Catherine Pooler's Minis - Party Collection
Clear Embossing powder
Sentiment stamps from my stash
Tonic Nuvo drops
Kitchen roll
paintbrush and water

Here is what I did:

  1. Randomly stamped and embossed images from the Hibiscus stamp set onto white stamping card measuring 17 x 13.5 cms.
  2. Blended the white background with the red ink and splashed water onto it.  Before it dried, I blotted it with the kitchen roll to leave white splodges on the card
  3. I stamped and cut out a sentiment from my stash, you can use any of your own, and glued it to the card.
  4. Mat and layer the card onto white card and I used a burgundy card base and Nuvo drops in each corner to finish it off.
All finished.  Time to clean up that lovely inky mess.  

Maria
x

Thursday 18 July 2019

Tag It

Happy Colourific Thursday
This week I am sharing with you my Brusho tags
I have used  Stamp Sets
Art of Life (contains 4 stamps)


Campervan ~ For Sentiment (contains 22 stamps)


I punched out 3 tags and chose my Brusho colours
do love these backgrounds
I then grabbed my newspaper and stamped flower heads and did a few rips , coloured these with matching Distress Oxides
Stamped the flower onto the tags
Painted up the leafs
I stuck on the newspaper bits leaving a little border so I could colour black for a shadow effect
I stamped on the sentiment
and doodled around the edge of the tags 


Using a couple of random stamps I carried on with the background
Thank you for stopping by today

Wednesday 17 July 2019

Marleen DT - Flower Hello

Hello everyone

Its once again my turn to share a bit of inspiration using the stamps from
Colourific
For today I have used the stamp sets called
A6 - Moderne Flowers
A6 - Alphabet & Numbers

Find them in the STORE along with all the other amazing stamps.
 

I used a strip of watercolour card I had lying. I used a couple of different Distress inks and made a basic mop up of the colours. Once dry I stamped my flower repeatedly and also a spare oneon white card stock.

I covered the white flower with a couple of coats of clear embossing powder and stamped the the wee center and added on top.

The strip now stamped, I matted and layered on black card stock and stuck strait onto my card blank.I made my greeting by stamping the individual alphabet stamps to write the word "hello" onto a strip of white card stock. Last I finished with a bit of glotter glue here and there.
And that is it from me for today.
Thank you for popping by and for any comments left behind.
Don't forget to come visit me on FaceBook, Twitter, Instagram, Pinterest, Youtube or my FB page.
 Happy Crafting
 

Tuesday 16 July 2019

Thinkg of You..(warning may need your sunglasses lol)

Good Morning All..

Caz here with my very 1st post, as part of the Colourific Design Team...:)..Hope you like what you see..


Sentiment stamp is from stash..

I've used A5 size card and layered. 
1st layer have used Scattered Straw Distress Ink to colour edge..
Next size down I have used a stencil with Squeezed Lemonade Distress Ink, then stamped medium size flower using Scattered straw..Petals coloured with flexi markers.

Next layer again using Scattered Straw Distress ink..

Next layer I've again used a stencil and Squeezed Lemonade Distress Ink..
Stamped with largest flower, and medium flowers at edge..Coloured with flexi markers..

This i added using foam pads, to base layers.
Also added some pearl drops .


                         Thank you for looking

                                      Caz xx

Monday 15 July 2019

A Little Note To Say - A6 Leaves Clear Stamp Set

Good Morning

Alice here, hope you are all well and ready for another Monday morning!


A week or so ago, I found a new technique to make a wreath.  You can make your own Build a Wreath template by following tutorials on You Tube.  I knew this technique would work well with the Colourific A6 Leaves Clear Stamp Set.  You can find this stamp set, and many more super stamps  by looking on the Colourific Website here


Materials Used:

6 x 6 White Card
5.5 x 5.5 White Mat
5.5 x 5.5 Green spotty mat
5 x 5 White Mat
Butterfly Die
Various coloured inks

  • Inked the largest mat with sage green ink and the smaller one with lilac ink.  
  • Used my stamping platform and my homemade template to make the wreath using various sizes of leaves and flowers.  Using a scalpel I carefully cut out the centre of the wreath.  
  • Using the stamping platform, I stamped the border around the edge of the 6x6 card, then layered the largest mat onto the white card.  
  • Stamped the sentiment onto white card, cut it out and inked the edges with lilac ink.  I shaped the sentiment using a bone folder and attached it through the wreath, then used foam pads to attach the wreath mat onto the green spotty mat and attached it to the card. 
  • Finished off with a die cut butterfly which was inked with green and lilac inks. Finally added small pearls to the card and the centre of the butterfly.
I really liked this card and hope you do too.


Sunday 14 July 2019

Peonies


Hello, it's Liz here. Today my card features the 'Peony' set. I stamped onto watercolour card using my Distress Markers. I used Aged Mahogany for the flowers and Frayed Burlap for the leaves. I like that I can use my markers directly onto stamps if I don't have the colour I need in an ink pad. Then I coloured with the markers, some water and a paintbrush. I know a lot of folks don't like to fussy cut but I love it! So relaxing.

Thanks for stopping by today, happy crafting!

Friday 12 July 2019

Happy Campervan

Hi everyone,

It's my turn to post my first card as a member of the Colourific Design Team.  I've called my card Happy Campervan because it reminds me of a holiday I had in one when I was young and everyone I know that has a campervan absolutely loves it.  It would make a great birthday card for a 17 year old as they are now old enough to learn to drive.


Materials used:

7 x 7 Card blank
Stamping card
Campervan stamp pack
Versafine Black Onyx
Wow clear embossing powder
Christine Pooler ink pad minis - Party Collection
Silver and black watercolour paint
Glossy Accents
Button from my stash
3D foam Pads
Gems
Uniball Signo white gel pen

Here's how I made it:

To make my card, I stamped and embossed the campervan onto a piece of stamping card using an Onyx Black Versafine ink pad and clear embossing powder.  

I coloured the image in using Christine Pooler Mini ink pads with silver and black watercoloured paint.  


Then cut out the image and added glossy accents to the lights, gems to the indicators, a button as the badge and added a little white pen as a highlight. Then let it dry - walk away!!!!


For the backing I stamped the medium flower onto a piece of 6.x 6" stamping card to make a border.

I mounted the background onto a wine coloured card and then onto the white card base.  The campervan is adhered to the card by using a combination of 3D foam and 3D glue gel.

Finally, I stamped and cut out the number plate and the Happy Birthday sentiment and used a 3D foam pad to give them extra dimension.

The campervan stamp set contains 22 stamps in total and can be bought on the Colourific site here along with many more beautiful stamps.

Hope you like it, have fun!

Maria 


Thursday 11 July 2019

The Missing Piece

Happy Colourific Thursday Jan here today 
Wow these weeks fly by soon be the weekend again
I am here today to share with you
'The Missing Piece'
Cutting the jigsaw piece on my portrait
I used Distress Oxide Inks to create the background
Once dried I stamped on the flower and the sentiment from
The Stamp Set

I used watercolour Pencils on the leaf and added some Nuvo Drops to the flower.
Have you seen all the lush stamps in store??
Be sure to take a peek and remember Free Delivery in the UK (orders over £5)
See you next week

Love Life

Good Morning Monday again.  The weather here has been awful, rain, hail, snow, and sunshine all in the one day! Too wet and cold to go out...