Showing posts with label Tonic Nuvo Drops. Show all posts

Tuesday, 15 October 2019

Celebrate Wordage Stamps on Coral and Amber

Everyone needs some word stamps and these from Colourific are just what you need.  You don’t even need a picture on these cards as this next one shows.
Here’s what you will need:

A5 Dark Red Card Blank
White Stamping Card
Black card for mounting
Distress Oxide inks - Abandoned Coral and Fossilized Amber
Blending mat or glass mat
Red Harmony Ink pad
Red and yellow fineliner
Onyx Black Versafine
Peach and yellow Nuvo drops
Gold gilding wax

Here’s how I made it:

  1. Stamp the Distress Oxides onto the stamping mat, spritz with water and swish the stamping card through the ink. Dry the ink off and repeat until you are happy with your background.
  2. Make sure the ink is completely dry before you stamp the Celebrate stamp onto the middle if the card in the red harmony ink. Colour in the gaps of the word with the red fineliner and the flourish and the stars in the yellow fineliner - see picture.
  3. Stamp the Congratulations and your special occasion in black versafine.
  4. Distress the edges with the Gilding wax.
  5. Mount onto black card, then into the dark red card blank.
  6. Distress the edges if the card blank with gold gilding wax - I use Pebeo gilding wax.
  7. Finish off by adding co-ordinating Nuvo drops in the corners of the dark red card and the inky background.
This is a stunning card which doesn't show up well in the photograph - messy and fun to do. Just remember to make sure all the inks are dry before moving to the next stage.

See you soon for the next tutorial


CONGRATULATIONS ON YOUR NEW HOME

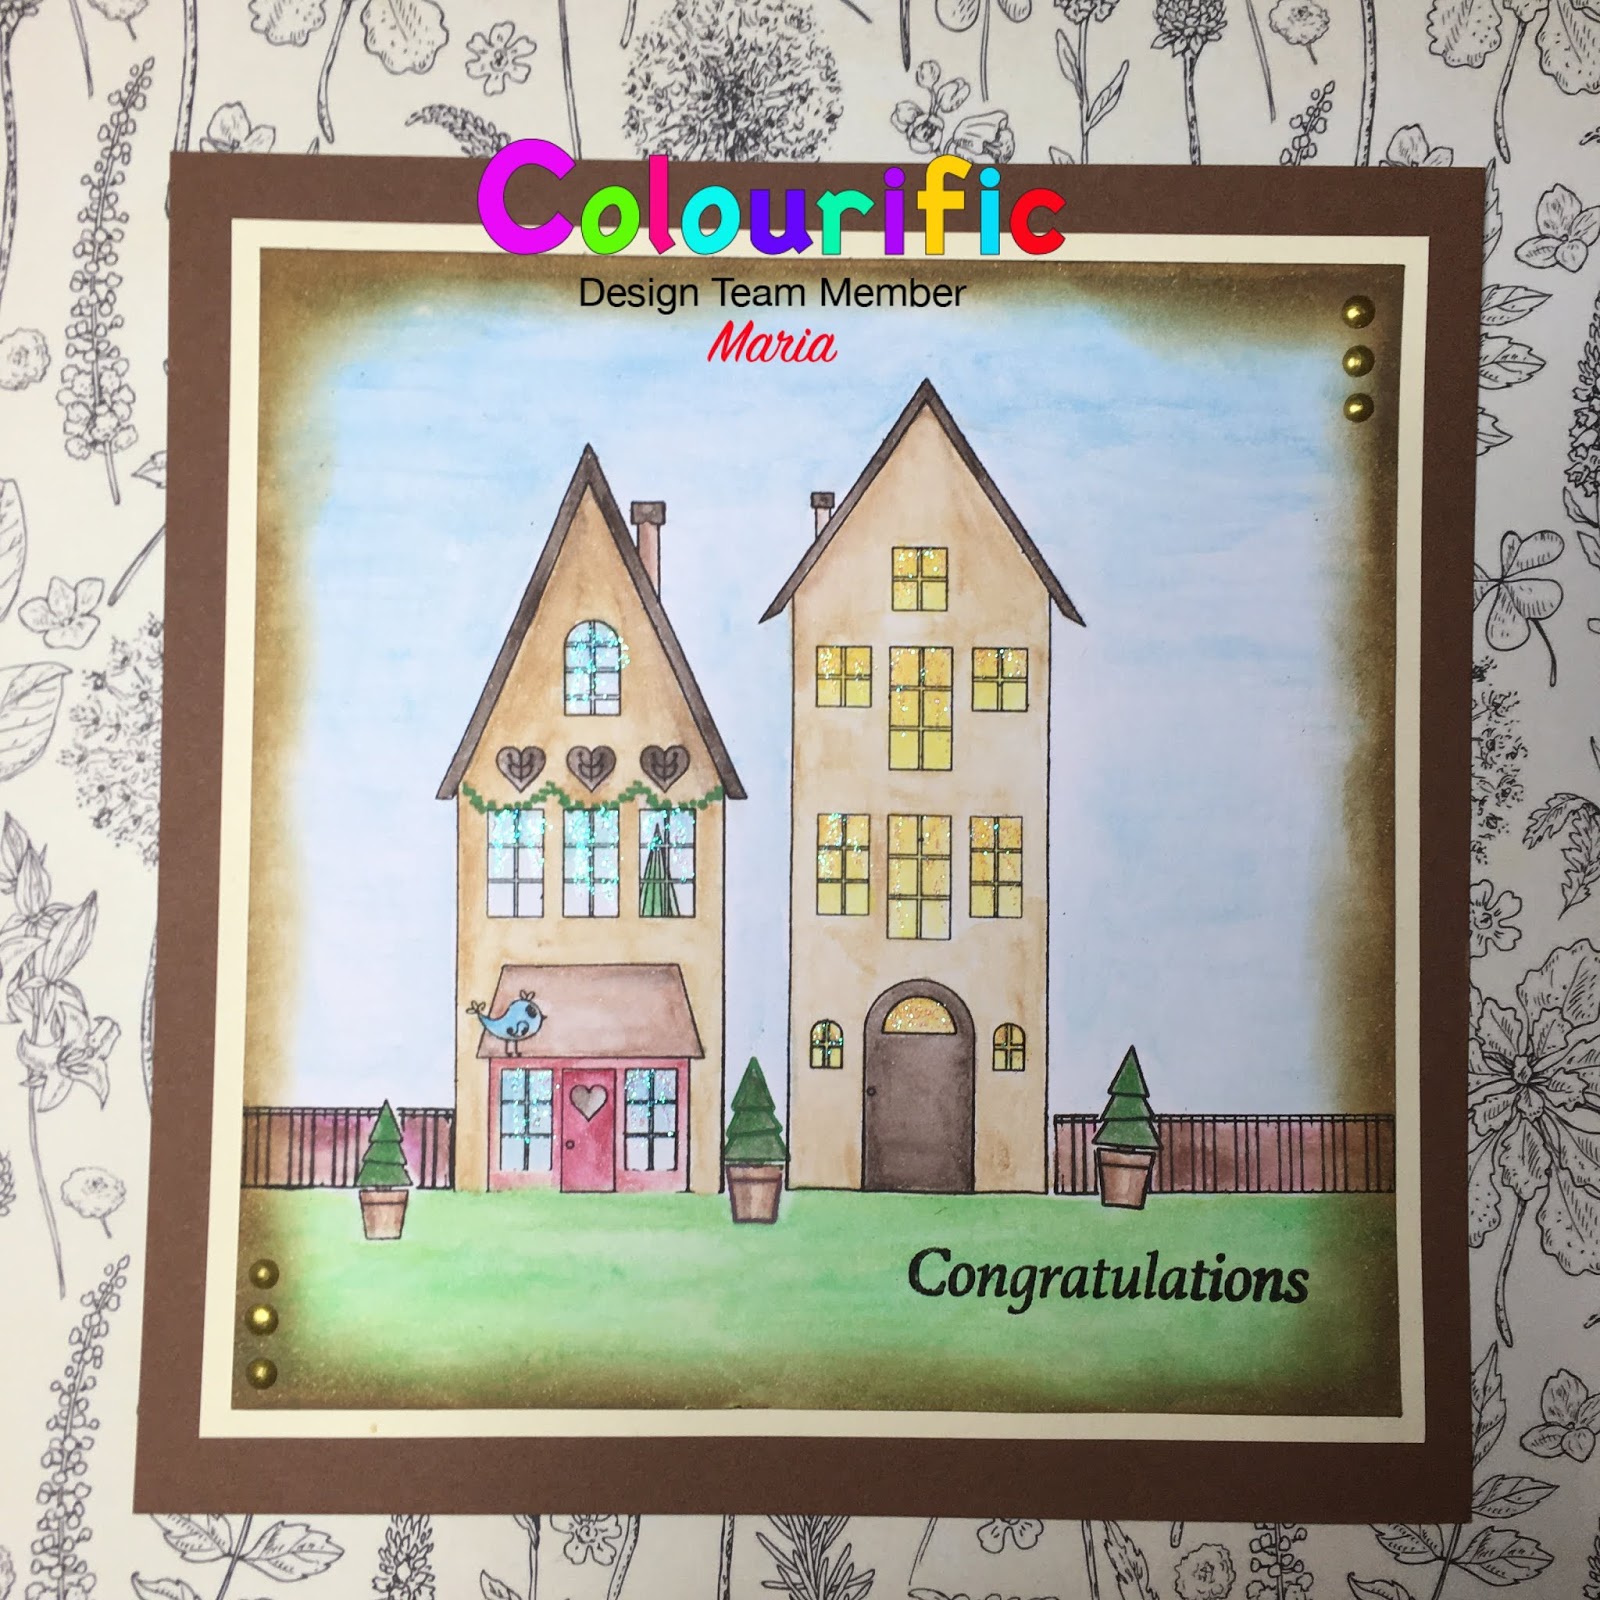
Here’s another of my cards from the new launch of stamps from Colourific . This time I’ve used the A5 Houses stamps. These lovely stamps come in a pack with lots of accessory stamps to decorate your homes and gardens.
Here’s whst you will need:

A5 Houses stamp set
White Stamping Card
Cream Card for mounting
Base card - I used a Brown 6” square card
Versafine Onyx Black
Watercolour paints
Distress Ink, Brushed Corduroy
Iridescent Glitter Glue
Gold Nuvo Drops

Here’s how I made it.


  1. Stamp the two houses into a piece of 5x5” stamping card using Versafine.
  2. Stamp the fence at either side of the Houses, then add the fir trees in the garden.
  3. Stamp one of the houses with the garland swag.
  4. Using a really fine paintbrush, paint the houses, fence and fir trees in watercolour.
  5. Using a wider brush, paint the sky and grass.
  6. Blend the Distress ink around the edges.
  7. Stamp Congratulations in Black Versafine onto the grass bottom right.
  8. Mount onto the Cream Card (5.5x5.5”), then onto the card blank.
  9. Finish off by adding a touch of glitter glue to the windows and add 3 Gold Nuvo Drops to the top right and bottom left corners.  Let this dry.


That’s your card completed.

See you next time.

Friday, 4 October 2019

Rainbow Hibiscus

Hi everyone, Maria here, hope you are all well.  Today I have the Rainbow Hibiscus card for you.  Made using the Hibiscus Stamp by Colourific.
Here’s what you will need:
A5 Hibiscus Stamp from Colourific
Versamark ink pad
White Embossing Powder
Multicoloured die inks - I used Catherine Pooler minis Life if the Party set
Nuvo drops - multicoloured
White Stamping Card
7x7” white card blank
3D Foam Pads
Coloured Card for mounting - I used pastel pink and blue
Sentiment stamp - I used Thanks from my stash.

To make the card:

  1. Take a square of white stamping card for the main background (I used 6” x6”), and blend the coloured die inks in stripes diagonal lines across the card.
  2. Randomly stamp the stamens, flourishes and blooms using the Versamark and emboss using the white embossing powder.
  3. Using the green ink pad, stamp the small stamen randomly on this backing paper.
  4. On a separate piece of stamping card, stamp different sizes of the blooms in different colours and cut out leaving a small white border.
  5. Using the same colour Nuvo Drops as the blooms, work your way around the outside of each bloom making small dots. Do this to all the cut out blooms.  Leave these to air dry.
  6. Mount up the backing paper onto the pink and blue card and stick these onto a 7x7” card blank.
  7. Add 3 yellow Nuvo Drops to each of the corners in the white card base and leave to dry.
  8. Stamp a sentiment, I used Thanks from my stash, and mount using 3D foam pads.
  9. Finally, once the Nuvo drops are set, attach the blooms to the card using 3D foam pads.
Voila, all done.  Hope you like it. See you next week with another new card.

Friday, 2 August 2019

Believe

Happy Friday everybody, Maria hereI've used the Colourific A5 Hibiscus stamp set to make this lovely card.
If you like my card and want to make one like it, here is what you will need:

A5 Hibiscus stamp from Colourific
White watercolour card
Distress Oxide inks in Candied Apple, Twisted Citron, Weathered Wood, Twisted Lemonade
Catherine Pooler Minis set - Life of the party - Lime Rickey, Tiara, Tutti Frutti
PVA Glue
Dark red card
3d Foam Pads
Coloured pencils, I have Faber-Castell Polychromos
Pink Tonic Nuvo Pearl drops
8 x 8 card blank

Here is what I did:
  1. Use the Distress Oxides to make a splodgy background by stamping on a blending mat, adding water and swishing a piece of card through, just smaller than the 8x8" card blank.  Dry with heat gun.
  2. On a smaller piece of watercolour card, wet it with water and stamp the inked up solid flower stamp (I used the medium one) by using the Catherine Pooler Inks, yellow in the middle and red on the outside.  Spritz with water again until the inks all blend together - then dry with heat gun.
  3. Stamp the large solid flower and the swirls onto a separate piece of water coloured card and cut out leaving a small border.
  4. Use a red coloured pencil to colour the inside part of the flower head.
  5. Use a sentiment stamp from your stash and stamp onto a separate piece of card and again, cut it out.
  6. Mount up the cut out images onto the smaller piece of background card using the glue for the flower stems and 3D foam pads for the blossoms.
  7. Add small dots of the Nuvo Pearl Drops to the inside of the flower and let it dry.
  8. Mount this topper onto a piece of dark red card which is cut out slightly larger to give a dark border.
  9. Mount this on an angle onto the Distressed Oxide background, then attach it to an 8 x 8" card Blank.
  10. Finally add the sentiment on a piece of 3D foam.

There you have it, all done.  Don't forget to clean up through the background inking process, it can be quite messy, but that where the fun is!


Hope you enjoy making this card, if you do leave me a message and tell your friends.


Bye for now
Maria


Thursday, 1 August 2019

Pillow Boxes

Happy Colourific Thursday Jan  
August 1st really??
 here today to share with you some Pillow boxes I made
I do love to make these
I used two stamp sets from Colourific
and
Both Beautiful Stamp Sets with lots of potential

I cut my boxes out using my portrait cutter and added some acetate to the windows
(For those that know me ....Yes the paper is from B n M's Bargain at £2.99 this one is called Grandma's Garden)
Very easy to make up with only one glue line needed


I then stamped up the flowers and leaves a few times so I could layer up
I coloured these with distress ink and used a white Posca pen for detail
There are some tiny little middle stamps in the sets I covered these with Nuvo Drops and left all to dry.............
I made up my flowers and attached middles , there very shiny in real life
Attached the flowers to my Pillow boxes 

A very easy, and simple project
They just need to be filled with goodies now
Thank you for stopping by


Friday, 19 July 2019

Multicoloured Hibiscus

Hi everybody,

It's Friday, so It's my turn to show you all a card.  I used the A5 Hibiscus stamp to make this card, I wanted something summery and colourful, so here is what I came up with:

What you will need:

A5 Hibiscus stamp from Colourific
Stamping card
A4 Burgundy card
Multicoloured embossing inks - I used Catherine Pooler's Minis - Party Collection
Clear Embossing powder
Sentiment stamps from my stash
Tonic Nuvo drops
Kitchen roll
paintbrush and water

Here is what I did:

  1. Randomly stamped and embossed images from the Hibiscus stamp set onto white stamping card measuring 17 x 13.5 cms.
  2. Blended the white background with the red ink and splashed water onto it.  Before it dried, I blotted it with the kitchen roll to leave white splodges on the card
  3. I stamped and cut out a sentiment from my stash, you can use any of your own, and glued it to the card.
  4. Mat and layer the card onto white card and I used a burgundy card base and Nuvo drops in each corner to finish it off.
All finished.  Time to clean up that lovely inky mess.  

Maria
x

Saturday, 13 October 2018

Congratulations Toast - Design Team Member: Verity


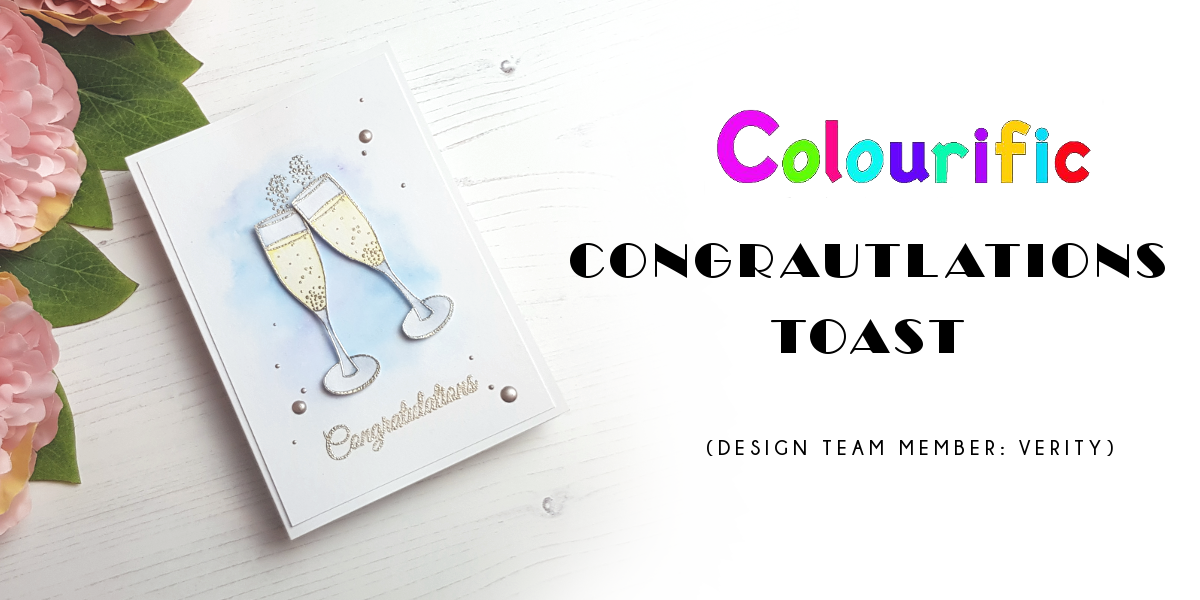
Hello! So good to be here. It's Verity here from Pretty Little Button with another card for you today. This card was one of the first cards I made when I received the lovely stamps from Colourific. However, I am only just getting around to showing you it today. This card is very easy to make and the stamps from Colourific do all the talking on this card!


Congratulations Toast card details:

To start, heat emboss in platinum embossing powder two champagne glasses onto white card. These were coloured in with watercolour paints, but I did not use watercolour paper. The amount of water used was very small so I was able to get away with just using the regular white card. Watercolour paper isn't a true white, which I wanted for the card, so this I why I did not use watercolour paper. If you prefer to, you can do this just as well with watercolour paper. 

Handmade congratulations toast card made by Verity Biddlecombe

I only used a couple of colours for this card, using a blue-grey for the glass and a light yellow for the liquid. I didn't do any fancy shading and wanted to keep it simple. These were fussy-cut out once dry.


For the background, I added clear water to a white card panel and dropped in a selection of blues allowing them to blend on their own. I did not add the colours close to the edge of the water on the card in order to get a soft fadeout.

The panel was adhered to a white card base and the glasses foam mounted on top. There is a little 'bubbles/fizz' stamp in the stamp set which I heat embossed directly onto the card panel above the glasses, along with a sentiment beneath. 


The card was finished with a few platinum Nuvo drops as embellishments. 


I hope you love today's card and don't forget to check out the stamp set, link below. If you loved this card please leave a comment below as we would love to hear from you. 


Until next time!

Verity


Pretty Little Button Blog | Instagram | Facebook | Youtube


Love Life

Good Morning Monday again.  The weather here has been awful, rain, hail, snow, and sunshine all in the one day! Too wet and cold to go out...