Monday 30 September 2019

Hibiscus - Thinking of You

Good Morning

Alice here, Monday Morning again, and another Blog from me.  I started this sample out as CAS, but as you can see, as always, it didn't work out.  Guess I am not so good at clean and simple.  Another little card using the A5 Hibiscus Stamp set.  You can find this stamp set and many other fabulous stamps here


Materials Used:

 A5 Hibiscus Stamp set
A6 Leaves
A6 Borders and Stems
Parchment Paper
Distress Inks
Clear Embossing Powder
Nuvo Drops
Square Dies
6x6 White Card Blank

  • Used the A6 Borders to stamp around the edge of the card
  • Used A6 Leaves and 2 colours of distress ink to stamp out leaves, then fussy cut out.
  • Using distress inks, stamped the Hibiscus flowers onto parchment paper, then embossing with clear embossing powder.  Flowers were then fussy cut out.
  • Cut out a black frame using square dies and attache to centre of card.  Added a sentiment die cut to the top left hand side of square.Stamped and cut out the stamens to add to centre of largest flowers.


Friday 27 September 2019

Reindeer in a Snow Globe

Hi everyone, Maria here with another idea for a card using the Winter Wonderland stamp set from Colourific.
Here's what you will need:

A5 Winter Wonderland stamp set
1 sheet red card
1 sheet stamping card
Silver mirror card
Snow globe and circle cutting die
Versafine Onyx Black
Clear Glitter Glue
Water colour paints
Gold Gilding Wax
Paper mask or liquid masking fluid
Water colour paints

Here's How I made it:
1. Die cut 3 Snow Globes in Dark Red card and one in stamping card
2. Die cut 1 circle in the middle of one of the red globes and one in white stamping card.
3. Stamp the image of the reindeer in the centre of the white stamping card circle and mask the reindeer.
4. Watercolour the blue sky, then remove the mask and paint the reindeer.
5. On a separate piece of stamping card, stamp a few of the medium and small Christmas Trees, water colour them in and fussy cut them out.
6. Glue the trees onto the circle and draw in some snow hills using the clear Glitter Glue.  Add some glitter to the trees and dot the sky to give snow.
7. Once dry, stick this circle to one of the red complete snow globes.
8. Add mirror card behind the base of the globe with the cut out circle, then apply the gold Gilding Wax to almost cover the red card.
9. Glue this frame onto the top of the globe with the topper on.
10. On the third snow globe, make a fold 1 cm from the top of the globe and attach this base to the decorated globe by gluing the 1cm at the top of the globe.  This will enable the globe to stand up like a card.

That's it, all done


Wednesday 25 September 2019

Marleen DT - A take on No Line Colouring.

Hello Bloggers
And welcome.

Today I want to share a take on "No Line" colouring.
As per usual I have used stamps from Colourific, and this time I used the
Hydrangeas
set.
Its a technique I love the look of but just never got the hang off. I'm not a whizz at colouring in anymore, simply because I stopped doing it as it was so time consuming. Instead I now use watercolours as I love the look and also as its so much faster than markers.


Anyway. I was playing the other day and decided I wanted my flowers to be colourful, so I stamped the flowers with Distress Oxide inks. It looked pretty but I wanted more colour so I went ahead and used the same colour inks as the stamped lines, to colour with. I simply pressed the ink pad on to my craft mat and used a water brush to colour in with.

The oxide ink leaves an oxidiced look to the colours.. hence the name I'm guessing lol, but it gives the colouring a bit more life. As I used the same colour the lines blure into the colouring.

It was an easy way to achive the look but I also believe its may be a good starting point to really learn this technique.

If you missed my YOUTUBE from last week, also using stamps from Colourific,  pop over HERE to watch it.

And dont forget to come and visit us in the Colourific FACEBOOK GROUP. We have a monthly "Anything goes" (open to all stamps) challenge with a prize donated form Colourific.

And that is all from me for today.
Thank you for popping by and for any comments left behind.
Don't forget to come visit me on FaceBook, Twitter, Instagram, Pinterest, Youtube or my FB page.
 Happy Crafting


Monday 23 September 2019

Peony With Love

Good Morning

Alice here, hope you are all well this morning.  Here is my blog post for today.  Had another play with the A5 Peony Stamp Set.  Just love this versatile little stamp set.  You can find this and many more on the Colourific Website


Materials Used:

A5 Peony Stamp Set
6x6 Black Card Blank
5.75 x 5.75 Gold Mat
5.5 x 5.5 White Mat
Embossing Folder
Scraps of Gold adn Black Card
Distress Inks
Copic Markers
Glitter Glue
With Love Sentiment Die
Black Thread


  • Matted the gold then black mats onto the 6x6 black card blank
  • Used the embossing folder to emboss the white mat
  • Placed some pink and yellow distress inks onto a blending mat and sprayed with water. Used the edge of the embossed mat and pulled it lightly through the ink, so give a distressed look.
  • Used the yelow and pink distress inks to ink around the remainder of the card.
  • Stamped the Peony out with Memento Ink and coloured with copic markers. This was then fussy cut out.
  • Stamped a stem with green distress ink and fussy cut out.  Attached the stem to the right hand side of the card.
  • Placed some glue gel at the top of the stem and added some scrunched up black thread.  Arranged this so that it would pop out at the sides of the Peony flower then added flower on top.
  • Used dies to cut out three different width banners, layered them together and added to left hand side of card.  Cut out the With Love Sentiment and added to centre of banner

Friday 20 September 2019

Gatefold Deer in the Forest

Hi everybody, 
It's Maria here, my turn to show you a card.  I've used the Winter Wonderland stamp set from Colourific to make this lovely gatefold card.
To make this card you will need:
A4 White card
A5 Winter Wonderland Stamp set
Co-ordinating winter backing paper
Die cuts of Reindeer and snowflakes
Distress Oxides for colouring
White Pen
Grey Alcohol pen
Versafine Smokey Grey ink pad
Catherine Pooler Aquatini ink pad
Tacky Glue
Green Sparkly paper/glitter card
Frame Die
Gelly Roll sparkle pen
Black Fineliner

This is how I made it:
1.  Cut a White card base 294mm x 150mm - to make gatefold, score at 73mm and 220mm.
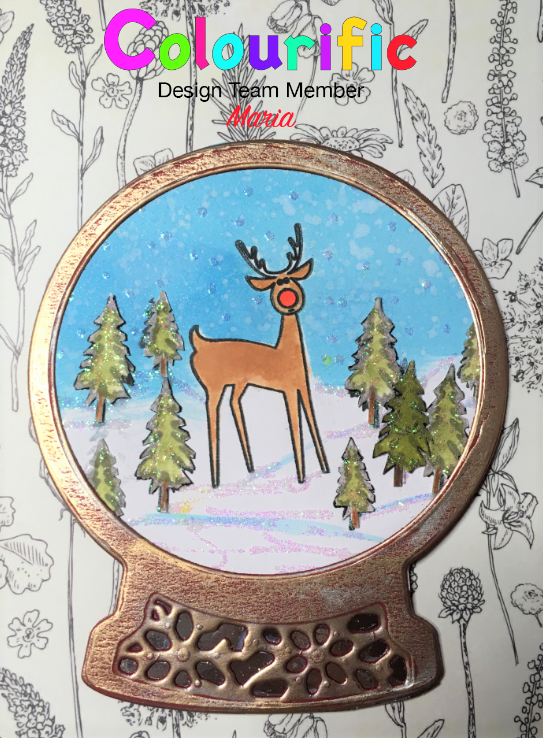
2.  Cut a piece of stamping card 92mm x 135mm and stamp the deer onto the card, then make a mask and cover the image.
3.  Using a blue Distress Oxide ink pad, gently blend the top of the card to show blue sky, fade out towards the bottom 1/4.
4.  Stamp the bare trees using the grey Versafine in the two different sizes and with a grey alcohol pen draw shadows under the trees.
5. Remove the mask from the deer and colour using the different colours of Distress Oxides.  I used a Gelly Roll sparkle pen for the antlers and a fineliner for the nose.  I then coloured the trees and added white pen to highlight areas of the trees.
6.  Blend around the outside of the topper with the Aquatini ink pad.
7.  Cut a piece of the green sparkle paper to 100mm x 143mm and mount the topper onto this.
8.  To make the shaped card base, I folded along the fold marks to make the gatefold shape, I slipped the frame die in the middle, cut side up so that it cuts the front two flaps, then put it through the die cutter.
9.  Next I cut 2 pieces of one backing paper and 1 of the corresponding paper to 5mm smaller than the back panel.  Take one of each paper and die cut a frame in the middle (line up to the card base before you cut). Then cut down the middle so you have 4 pieces.
10.  With the other square backing sheet, blend the edges with the Aquatini ink pad.  Centre and glue the topper to this sheet and glue to the inside of the card blank.
11.  Glue the cut pieces to the front gatefold flaps, leaving a small border on the inside of the cut.  Make sure you put the same pattern on the inside of the flap as the paper on the back panel.
12.  Glue two die cut reindeer to the front two flaps with a snowflake die cut at the top of each gatefold flap.
13.  Finally, add different sized snowflake die cuts to the outside of the topper on the back panel and add Gelly Roll sparkle pen onto the snowflakes.

There you go, all done. It does take a little time but it’s worth it. Don’t forget to give me a shout if you’re stuck.

Wednesday 18 September 2019

Marleen DT - Mixed Media card

Hello Bloggers
and welcome
Its once again wednesday and my turn to share some  inspiration using the amazing stamps from Colourific.  Ive used a selection of stamps for the mixed media card Ive made for today. You can find them all in the STORE.


I started by adding distress ink to my background. I used water colour card stock to make sure it could take enough water to make the colours blend.

I used Archival black ink to stamp strait onto my background. I used the A6 Borders and Stems and the A6 Grunge background.

I stamped the butterfly and the sentiment from the A5 Butterflies take flight set on to scrap watercolour card stock and also used distress ink to colour, but this time i used a homemade silver mist spray as my water. This has given the sentiment and the butterfly a bit of sparkle.

I cut out the butterfly and added to my card base usong foam tape.
The sentimet I cut into single words and added scattered around the card.

This is such an easy way to make a mixed media look to a card and can be done using any stamps you have in your stash.

And that is all from me for today.
Thank you for popping by and for any comments left behind.
Don't forget to come visit me on FaceBook, Twitter, Instagram, Pinterest, Youtube or my FB page.
 Happy Crafting

Monday 16 September 2019

Hibiscus in a Row

Good Morning

Alice here, with the usual Monday Morning Blog.  Halfway through September already, where are the weeks and months disappearing to.  Thought I would have a little play with the A5 Hibiscus Stamp set for this blog.


Materials Used:

A5 Hibiscus Stamp Set
A6 Campervan Stamp Set
A6 Moderne Flowers
6x 6 card blank
5.75 x 5.75 Black Card
5.5 x 5.5 Stamping Card
Pink, Blue and Green Distress Ink
Black Versafine Ink
Grey Versafine Ink
Gems
Happy Birthday Die Cut
  • Use a piece of torn A4 copy paper to mask off the top and bottom third the of card.  Used Pink Green and Blue Distress Inks to ink up the middle third of the card.
  • Using Black ink, I stamped 3 mall Hibiscus flowers on top of the inked background, then masked them off, and stamped in between these with 3 grey Hibiscus flowers.  Used one of the stems from the set to add a stem to each with the appropriate colour.  Used some small leaves from the Camper Van set to stamp on leaves.  Removed the top and bottom mask.  Got an inky mark on the white part of card, so used the grey ink pad to ink the edges of the card.
  • Attached black layer to white card base.  Use versamark ink pad add ink to edges of stamped layer and added some silver sparkle embossing power.
  • Cut Happy Birthday Sentiment and embossed with silver sparkle powder.
  • To finish off, I stamped 3 little butterflies from the Moderne Flower Stamp set, coloured with the three shades of ink and attached to the card.  Added a gem to the centre of each flower


Friday 13 September 2019

Forest in Winter

Hi everybody, Maria here.  Today I'm going to show you how to make the Forest in Winter card using the A5 Winter Wonderland Stamp from Colourific.
To make this card you will need:
A5 Winter Wonderland Stamp Set
A5 Blank white card base
A5 Dark Green card
A5 sheets of white card
Onyx Black and Smokey Grey Versafine ink pads
Water colour Pencils
Clear Embossing powder
Gelly Roll Clear Star pen
Distress Oxides - Peeled Paint, Cracked Pistachio and Iced Spruce
Mardi Gras Carnivale Colourburst
Double Sided Tape
3D Glue Gel

This is how I made it:
1. Trim the A5 white card and the dark green card by 1 cm top and bottom so that it fits within the card base leaving a nice border.

2.  To make the background, stamp the three Distress Oxides into a blending mat and spritz with water, swoosh one of the white cards into it and keep doing this until you are happy with the result.  It is good to dry off the card in between the swooshes - you get some lovely effects. After you have done the last swoosh, before drying sprinkle on some of the Mardi Gras Colourburst into the wet ink and give it a spritz with water to make the colour burst.

3.  Let this dry, once dry, stamp the small forest trees randomly all over the sheet.

4.  Take the other sheet of cropped white card a cut 2 diagonal lines from the bottom left corner to either side of the top right corner in a V shape - see card.

5.  Stick this to the green card matching up the sides so that all you can see is the dark green V in the middle.  Trim the green card to 2 mm border of the inside of the white card.  See card. This gives the inside a border.

6.  Stick both these corners to the background sheet you just made, matching up the corners to give you the colourful inset.

7.  Stamp the small dots stamp all over the white triangles in grey Versafine.

8.  Stamp the Winter Wonderland stamp on the edge of the right hand triangle and emboss with clear embossing powder.

9.  Stick this to the A5 card base.

10.  On a separate piece of white card stamp 2 of the large trees and 4 of the medium trees using the black Versafine.  Colour these in - I used watercolour pencils.

11.  Cut out the trees leaving a small white border.  I then used the gelly pen to glitter the snow on the trees.

12.  Arrange the two large trees and attach using 3D glue gel to the bottom left so that it covers the bottom end of the colourful insert, add the other medium tree to the bottom right.

That's it, all done - how I wish I had photographed this one as I made it - it's so hard to explain without pictures.  If you are stuck or struggling to understand please ask and I'll try and explain.  Next time I make another one like this I will do the pictorial step by step.

Bye for now
Maria x

Wednesday 11 September 2019

Marleen DT - Tiny Hearts background

Hello Bloggers
and welcome
Its my turn to share a bit of inspiration using the amazing stamps from Colourific. 
 You can find the stamp I've used and all the other fantastic stamps in the
STORE.

I have 3 cards to share today but they are all variations of the same ideas and I use just the 1 background stamp.
This is a technique you can do with any background stamp and with a bit of fiddling around with your inks, use any stamp you have.


These cards all started out as simple stamping on my card stock with my Tiny Hearts Background stamp. The gradient in the colours are made by overlapping the inks. I used Distress ink for all 3 cards and if you start with the lighter colour on your stamp they wont really contaminate each other.

After stamping I cut 2 of the backgrounds into strips and added them to my card with foam tape to give them a lift. Use regular tape if you don't want the extra bulk.

I finished with a couple of die cut sentiments and a few black gems..

And that is all from me for today.
Thank you for popping by and for any comments left behind.
Don't forget to come visit me on FaceBook, Twitter, Instagram, Pinterest, Youtube or my FB page.
 Happy Crafting


Monday 9 September 2019

There is Beauty in Simpicity

Good Morning

Alice here with my Monday morning Blog.


Materials Used:

A5 Peony Stamp Set
Black Memento Ink
Copic Markers
White Card

  • To make the gift bag, I cut the card into the appropriate sizes and scored and folded where appropriate.
  • Before assembling the bag, I stamped the Peony flower 3 times across the top of the front and back of the gift bag using a masking technique.
  • I coloured with copic markers then fussy cut out along the top edge of the card, keeping the remainder of the flowers attached.
  • I felt the front of the bag was very plain, so I embossed a sheet of white card and stuck it on before I did the next step.
  • I stamped I stamped 5 more Peonies and coloured them in with copics and fussy cut them out.  I also stamped and coloured an assortment of leaves and fussy cut.
  • I joined all the pieces of the gift back together and made it up.  
  • I punched  2 holes in the front and back of the gift back to attach the ribbon.
  • I arranged the 4 of the remaining coloured peonies along the front of the back raising them with foam pads.  Evenly attached the leaves evenly around the raised peonies with some glue.
  • Finally cut out a die shaped tag, embossed it with the same embossing folder.  Coloured the tag with Oxide Ink, the stamped a sentiment from my stash.  Added the final Peony to the front of the tag.  Finally punched a hole, threaded some ribbon through and attached to the bag.


Friday 6 September 2019

Blue Hibiscus Bloom

Hi everybody, it's Maria here with my Friday Colourific post.

Today we have the A5 Hibiscus stamp which is available from the Colourific website for only £12.99, Which I have coloured in blues and greens.
Here's what you will need:

A5 Hibiscus stamp set
Blues/Greens/Yellows - spray inks (I used Pearlywinks vibes)
Light Blue/Dark Blue/Green ink pads - I used Harmony ink pads
White Stamping card
Embossing folder (I used a Crafters Companion Sheena one)
White card blank 8 x 8"
Black card for mounting 
3D Foam Pads
3D Glue gel
Pokey tool
Blu tac
Silver Ribbon
Brads
Tacky Glue

Here's how to make the card
  1. Emboss a piece of white card 7.5 x 7.5" square and glue to the centre of the 8x8 card blank.
  2. Stamp out three of the large blooms in a light blue ink onto the Stamping Card - cut out leaving a small border.
  3. Stamp out 3 medium sized blooms in green ink onto the Stamping Card - cut out leaving a small border.
  4. Stamp out 3 small sized blooms in dark blue ink onto the Stamping Card - cut out leaving a small border.
  5. Spray the Blue/Green/Yellow inks onto a blending mat and spritz with a little water - then swoosh a piece of stamping card approx. 5.5 x 5.5" into the inks and swirl it around.
  6. Once dried, lightly spritz the same colours over the backing sheet to leave the speckles.  Leave this to dry naturally if possible.
  7. Layer up the blooms and place on a ball of blu tac - then push your pokey tool through the middle for your brad to fit through.
  8. Put one of the brads through the hole in each of the flower heads.
  9. Using the large stamen stamp, stamp four stems as per the photo.
  10. Attach 3D foam pads to the flower heads and place them on the top of the stems.
  11. Mount the topper onto a piece of slightly larger black card and then mount this onto the embossed card on the card blank.
  12. Tie a piece of silver ribbon into a bow  and attach to topper using 3D glue gel.
Hope you enjoy making your card, watch out for more next week.

Wednesday 4 September 2019

Marleen DT - Girls night out..


Hello Bloggers
and welcome

Its once again my turn to share some inspiration using the fantastic stamps from
 Colourific. 
 You can find the stamps I've used and all the other fantastic stamps in the
STORE. For todays post me and my little girl had a play session together.
We both used the A5 - Girls Night Out stamp set.


Sticking to what I do best, both Abbie and I simply stamped, coloured and added a sentiment.
I stamped using distress oxide and Abbie stamped with black ink and coloured with gel pens. We both finished with a die cut greeting and a few gems.
And that is it from me for today.
Thank you for popping by and for any comments left behind.
Don't forget to come visit me on FaceBook, Twitter, Instagram, Pinterest, Youtube or my FB page.
 Happy Crafting


Tuesday 3 September 2019

Flower Kaleidoscope Album

Good Morning everyone...Are we really in september!..Boy these months are flying...

Anyways Caz  here today with some inspiration for you..For my make this week i have used   


I've made a simple album this week..Very basic..Just box and cover is decorated..And inside ready for you to stick photos, notes or what ever you want..Album is a cutting file which i cut out on my cutting machine.


What i have used

Kraft Card..
Distress inks pickled raspberry and peacock feathers.
Odd stamps from my stash..


Thank you for looking

Caz 

Monday 2 September 2019

Live The Dream


Good Morning

Alice here, it's hard to believe we are in September now, where do the weeks and months disappear to!  Here is my project for this week.  Decided to have a play with the A5 Peony Stamp Set, you can find this and many more fabulous stamps here.Quite like the way this one turned out.


Materials use:

6 x 6 Brown Card Blank
4.75 x 4.75 Brown Mat
5.75 x 5.75 Kraft Card Mat
4.5 x 4.5 Kraft Card Mat
Versamark Ink Pad
White Embossing Powder
Copic Pens
Sentiment Stamp
2 sizes of circle dies


  •   Take the 5.75 and the 4.5 pieces of Kraft card.  Using a small piece of double
            sided tape centre the smaller one on top of larger one.
  •    Using Versamark Ink pad, randomly stamp the Peony flowers and leaves over the         card, making sure to overlap the small square onto the larger square. 
  •    Emboss the images with white embossing powder.  When this is done colour in the       flowers and leaves with copic markers.
  •    If you wish you can go over the images with a sparkle pen as I did, but this is not         necessary.
  •    Carefully remove the smaller Kraft Card from the larger one.
  •    Mat the larger card onto the 6 x 6 brown card blank.
  •    Mat the smaller Kraft square onto the 4.75 x 4.75 Brown Mat
  •    Apply the smaller mat to the card ensuring the images match up.
  •    Cut one large circle from Brown card and a smaller one from Kraft Card.  Stamp the     Live the Dream sentiment in the middle of the smaller circle and emboss with gold       embossing powder.  Mat the 2 circles together and attach to card.
  •    Finish off with some gold gems randomly scattered over card
Thank you for joining me.


Love Life

Good Morning Monday again.  The weather here has been awful, rain, hail, snow, and sunshine all in the one day! Too wet and cold to go out...