Showing posts with label Embossing. Show all posts

Monday, 16 December 2019

Christmas Trees and Baubles

Good Morning Everyone,

Alice here with a Monday Morning Christmas Blog.  I loved making this card.  Just love, black, white and silver together.


Materials Used:

A5 Trees
A5 Peace and Joy
8 x 8 Card Blank
8 x 8 Silver Mat
6 x 6 Silver Mat
5.75 x 5/75 Black Mat
5.5 x 5.5 White Mat
5,25 x 5.25 Black Mat
Silver Sparkle Embossing Powder
Versamark Ink Pad
Sparkle Pens
Large die from my stash

  •  Matted Silver Card onto white card blank
  •  Cut out Large die with black card, added to Silver mat
  •  Used Scrap card to make a silver and black banner, attached across centre of         card. 
  •  Using foam pads attach the 6x 6 Silver layer centrally on top of border.  Add white   mat to black mat and attach to silver mat with foam pads.
  •  On last black mat stamp large tree off the edge of the paper and emboss with silver   sparkle powder.  Used a mixture of baubles from Peace and Joy stamps and   randomly stamped towards left hand side of card and embossed with silver sparkle   glitter powder.  
  •  Added Christmas Greeting to bottom of card and again embossed.
  •  Attach the mat with foam pads and finish of with some gems
           Thank you for looking, hope you all have a great Christmas and Santa Claus is good to you.


Monday, 11 November 2019

A5 Trees - Lots of Love at Christmas

Good Morning

Alice here, with my Monday morning blog.  Not sure what happened last week, but I seem to have missed a week!  To much on my mind lately!  I used the A5 Trees stamp set which you can find here on the Colourific website.  I love this stamp set, its such a lovely tree.

Thank you for taking time to look.


Alice Mitchell – Lots of Love at Christmas

Materials Used:

A5 Trees
A6 Christmas Text
Snowflake Embossing Folder
8x x8 White Card Blank
7.5 x 7.5 Blue Glitter Card Mat
7.25 x 7.25 Pearlised Mat
4.74 x 6.25 Blue Glitter Mat
4.5 x 6 White Pearlised Mat
4.25 x 5.75 White Pearlised Mat
Stormy Blue Distress Ink
Versamark Ink pad
Clear Sparkle Embossing Powder

  • Attached 7.5 x 7.5 Blue Glitter Mat to card blank. 
  • Embossed 7.25 x 7.25 pearlised mat with Snowflake embossing folder and inked  edges with Stormy Blue Distress ink and attached to Blue glitter mat.
  • Using some scraps of Blue Glitter Card and White Pearlised Card I made a banner to go along the bottom of the card and stamped and embossed a Greeting from the Christmas Text stamp set at the right hand side.  Attached this to the bottom of the card.
  • Attached 4.5 x 6 pearlised with mat onto 4.75 x 6.25 Blue Glitter Mat
  • In a stamping platform, I Stamped Large Tree onto 4.25 x 5.75 Pearlised Mat with Stormy Blue Distress ink the stamped again over the top with Versamark ink and embossed with clear sparkle glitter powder.  Inked the edges with Stormy Blue Distress Ink then attached this to the above Mats.
  • Using some foam pads I attached the above mat onto the card.
  • Finished off with some die cut snowflakes, a bow and some gems 


Thursday, 17 October 2019

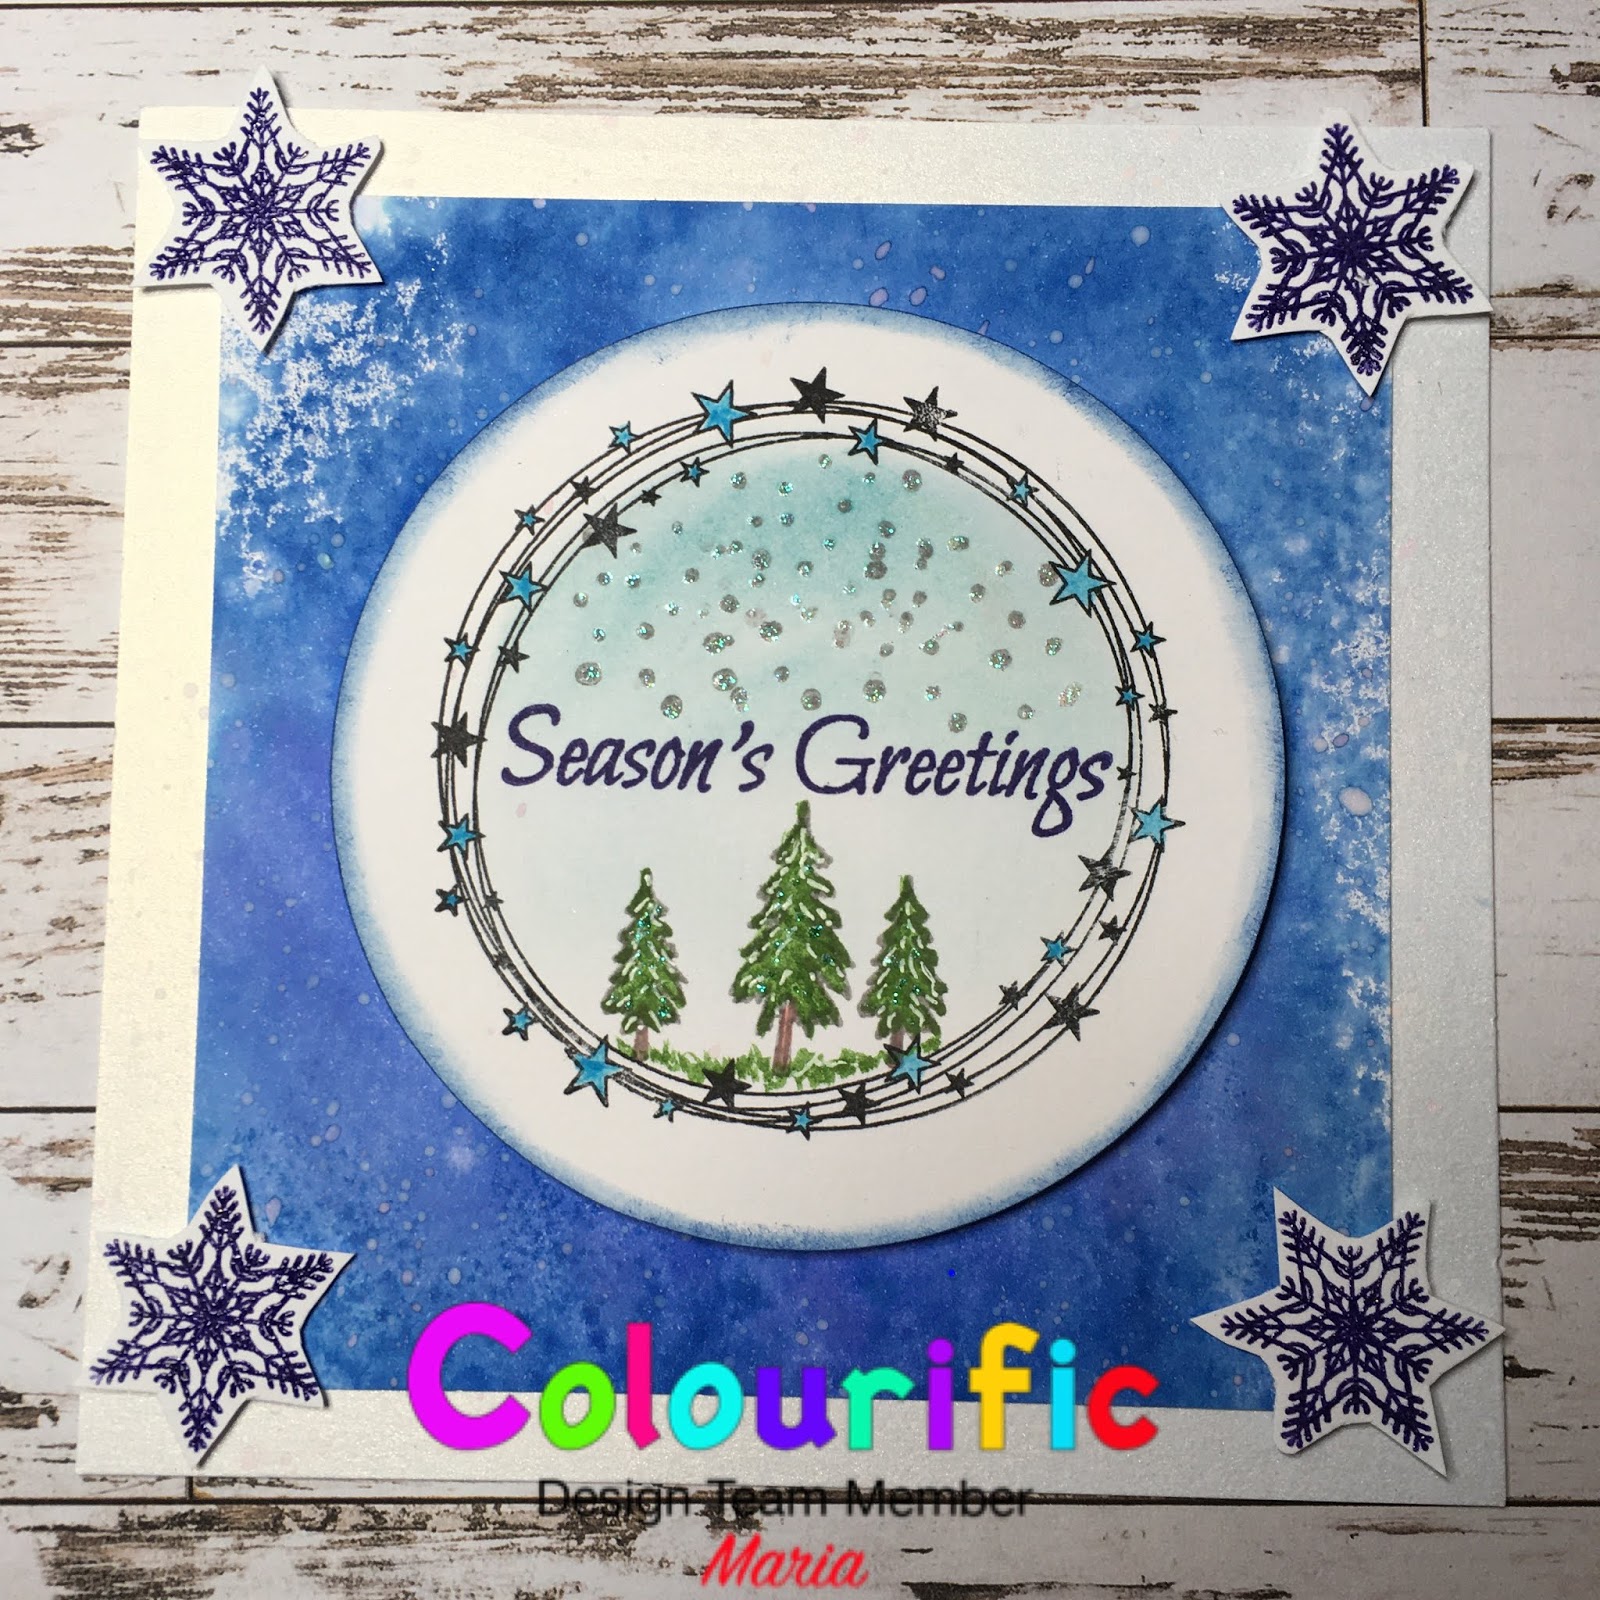
Winter Scene in a Ring

Here’s another card showing you one of the new stamp sets from Colourific.

Here’s what you will need:
A5 Rings stamp set
Winter Wonderland Stamp Set
Distress Inks - any blue - I used Salty Ocean
Watercolour paints or pencils
Clear Embossing Powder
Versafine Onyx Black
Versafine Clare blue
White and blue Gel Pens
Iridescent Glitter Glue
3D Foam pads
6x6” card base
Stamping card
Die cutter - circles or punch

Here’s how I made it;

  1. Cut a piece of 5x5” stamping card.  Stamp the Distress ink onto a blending mat and spritz with water, swish the card through the ink and dry.
  2. On a separate piece of card, stamp the stars ring in black Versafine.  Cut out a circle around this stamp - I used a die cutter or thus or you could use a punch. 
  3. Stamp two small trees, one medium tree and seasons greetings in the circle and colour with watercolour paints or pencils. Add a blue wash for the sky and draw in some grass under the trees.
  4. Stamp some of the small dots for snow and glitter the top of the dots.
  5. Stamp and emboss 4 snowflakes onto a separate piece of card and cut out.
  6. With the white gel pen, colour in some snow on the trees and with the blue gel pen colour in the stars of the ring.
  7. Mat the blue inked background onto the card base and adhere the circle to the middle of the card using 3D Foam pads.
  8. Add the snowflakes to the corners of the blue background using 3D Foam Pads.
Hope you enjoy making this card - the rings are very versatile and can be used as a frame for lots of small stamps and dies.


Monday, 7 October 2019

Build a Wreath Christmas Card

Good Morning

Alice here, with my first October blog.  I have put this off for as long as I could, but feel now is the time to start with the "Christmas Cards".  I made these using a "Build A Wreath" template that I made with a star shaped die.


Materials Used:

A6 Christmas Mini Stamps
A5 Peace and Joy Stamps Set
6x6 White Card
5.75 x 5.75 Red Mat
4.75 x 4.75 Red Card
5.5 x 5.5 Green Glitter Card Mat
5 x 5 White Card
2 sizes of Circle Dies
Oxide Inks
Alcohol Markers
Sparkle Pen
Silver Glitter Embossing Powder
  • Matted Red and Green Glitter Card onto white card blank
  • Cut larger circle die out of centre of 5 x 5 white card.  Cut smaller circle out of centre of 4.75 x 4.75 Red Card.
  • Used red Oxide Ink and inked lightly around the White mat.  Using the Build a Wreath Template and the middle branch from the Peace and Joy Stamp set, I stamped it around the circle in 2 colours of green.  Used the Holly, Robin, Snowflake, and Bell stamps from the Christmas Mini Stamps and stamped them evenly around the branches.  
  • Embossed the snowflake with Silver Embossing powder.
  • Coloured in all the images.
  • Using the Smaller Circle die, I cut out a circle of white card and stamped and embossed the Peace and Joy stamp onto the circle.  Stamped some Holly along the bottom and coloured the images.
  • Matted the Red Mat behind the Stamped Mat.  
  • Using foam pads matted the stamped layer onto the Green Glitter Card.  Added the Greeting to the centre.

Materials Used:

A6 Christmas Mini Stamps
A5 Peace and Joy Stamps Set
A6 Flying Unicorn Stamp Set
6x6 White Card
5.75 x 5.75 Red Mat
5.5 x 5.5 White Mat
5 x 5 White Card
3 sizes of Circle Dies
Oxide Inks
Alcohol Markers
Sparkle Pen
  • Cut the smallest circle die out Red Card Mat and layered onto white card blank.  Stamped and embossed "Peace and Joy" stamp into centre of circle.
  • Cut larger circle die out of centre of 5.5 x 5.5 white card.  Cut middle circle out of centre of 4.75 x 4.75 White Card.
  • Used Green Oxide Ink and inked lightly around the White 5.5 x 5.5 mat. 
  • Puting the larger white mat on the top and the smaller one behind, temporarily join them with a little bit of double sided tape.
  • Using the Build a Wreath Template and the middle branch from the Peace and Joy Stamp set, I stamped it around the circle in 3 colours.  Used the Holly, Robin and Bell stamps from the Christmas Mini Stamps and stamped them evenly around the branches.  Also used a small flower from the A6 Flying Unicorn Stamp Set.
  • Coloured in all the images.
  • Carefully separated the 2 white mats.  Matted the one with the middle size circle onto the red mat, ensuring the circles were even.  
  • Using foam pads matted the inked stamped layer on top of the previous layers.
  • Added some red gems to the holly berries and a silver gem to the centre of the flower.

Thank you for looking


Monday, 2 September 2019

Live The Dream


Good Morning

Alice here, it's hard to believe we are in September now, where do the weeks and months disappear to!  Here is my project for this week.  Decided to have a play with the A5 Peony Stamp Set, you can find this and many more fabulous stamps here.Quite like the way this one turned out.


Materials use:

6 x 6 Brown Card Blank
4.75 x 4.75 Brown Mat
5.75 x 5.75 Kraft Card Mat
4.5 x 4.5 Kraft Card Mat
Versamark Ink Pad
White Embossing Powder
Copic Pens
Sentiment Stamp
2 sizes of circle dies


  •   Take the 5.75 and the 4.5 pieces of Kraft card.  Using a small piece of double
            sided tape centre the smaller one on top of larger one.
  •    Using Versamark Ink pad, randomly stamp the Peony flowers and leaves over the         card, making sure to overlap the small square onto the larger square. 
  •    Emboss the images with white embossing powder.  When this is done colour in the       flowers and leaves with copic markers.
  •    If you wish you can go over the images with a sparkle pen as I did, but this is not         necessary.
  •    Carefully remove the smaller Kraft Card from the larger one.
  •    Mat the larger card onto the 6 x 6 brown card blank.
  •    Mat the smaller Kraft square onto the 4.75 x 4.75 Brown Mat
  •    Apply the smaller mat to the card ensuring the images match up.
  •    Cut one large circle from Brown card and a smaller one from Kraft Card.  Stamp the     Live the Dream sentiment in the middle of the smaller circle and emboss with gold       embossing powder.  Mat the 2 circles together and attach to card.
  •    Finish off with some gold gems randomly scattered over card
Thank you for joining me.


Monday, 19 August 2019

Happy Birthday - Black Ice Technique

Hi Everyone

Alice here, can't believe we are in the third week in August!  


Materials Used:

6 x 6 White Card Blank
5.75 x 5.75 Black Mat
5 x 5 Glitter Card
4.5 x 4.5 Black Mat
4.25 x 4.25 Gold Mirri Mat
Sentiment Stamp
Couple of Circle Dies
Stazon Ink Pad
Versamark Ink Pad
Clear Embossing Powder
Gold Embossing Powder

  •    Matt larger Black, Gold Giltter Mat onto white card blank.  Using foam pads add            small black mat onto card.
  •   Using stays on ink, hold it lightly and drag it down along the length of the gold mirri      mat.  Add a little extra black Stazon at the top and bottom edges of mirri card.              Stamp the Kaleidoscope Doily onto the centre of the mirri card.  Ensure all ink of          mirri card is dry before moving onto next step.
  •   Using the Versamark ink pad drag it from top to bottom of mirri card. Ensuring you        do not overlap.  Do not push down on ink pad, let the weight of the ink pad do the        work.
  •   Sprinkle clear embossing powder all over the heat with heatgun.  This produces the      iced look.
  •   Mat the finished piece onto the raised black mat. 
  •   Stamp the smaller circle with your greeting and emboss (I also embossed the                outside edge of the circle).  Using foam pads add this to the larger circle and glue        onto centre of doily.
Thank you for popping by to look.


Love Life

Good Morning Monday again.  The weather here has been awful, rain, hail, snow, and sunshine all in the one day! Too wet and cold to go out...