Showing posts with label Winter Wonderland Stamps. Show all posts

Friday, 22 November 2019

Evergreen

Hi, Maria here with my Friday post.  Today we have the Evergreen card which is made using 3 different Colourific stamp sets - Winter Wonderland, Beach Borders and A5 Rings.

Here’s what you will need-
6x6” Card Blank
5x5” White Stamping Card
5.5x5.5” Dark Green Card 
Winter Wonderland Stamp Set
Beach Border Stamps
A5 Rings Stamp Set
Black Versafine ink pad
Clear embossing powder
Tonic Nuvo Drops in Gold, Turquoise, Light Green, Dark Green, Silver
Clear sparkle Glitter Glue
Green Versafine
Watercolour paints

Here’s how I made it
  1. Using the 5.5x5.5” stamping card, stamp the Star Ring in the centre of the card using the Versafine black ink and emboss with the clear embossing powder.  Fill in the stars using green watercolour paint.
  2. Stamp a Medium Tree and two smaller trees, from the Winter Wonderland stamp set, into the middle of the Ring and colour in using the Watercolour paints.
  3. Using the green Versafine Ink, stamp and emboss the sentiment from the Winter Wonderland stamp set just under the ring.
  4. Now take the pebbles border from the border stamp set and stamp and emboss around the outside edges if the square.
  5. Using the Nuvo drops, randomly fill in the pebbles.
  6. Add some clear glitter glue to the trees and under the trees to ground them - to look like snow.
  7. Leave this to dry for a few hours to make sure all the Nuvo drops are dry.
  8. Mount onto the dark green card then adhere to the card blank.
There you go, all done, hope you like it.  Tune in next week for another card.


Thursday, 17 October 2019

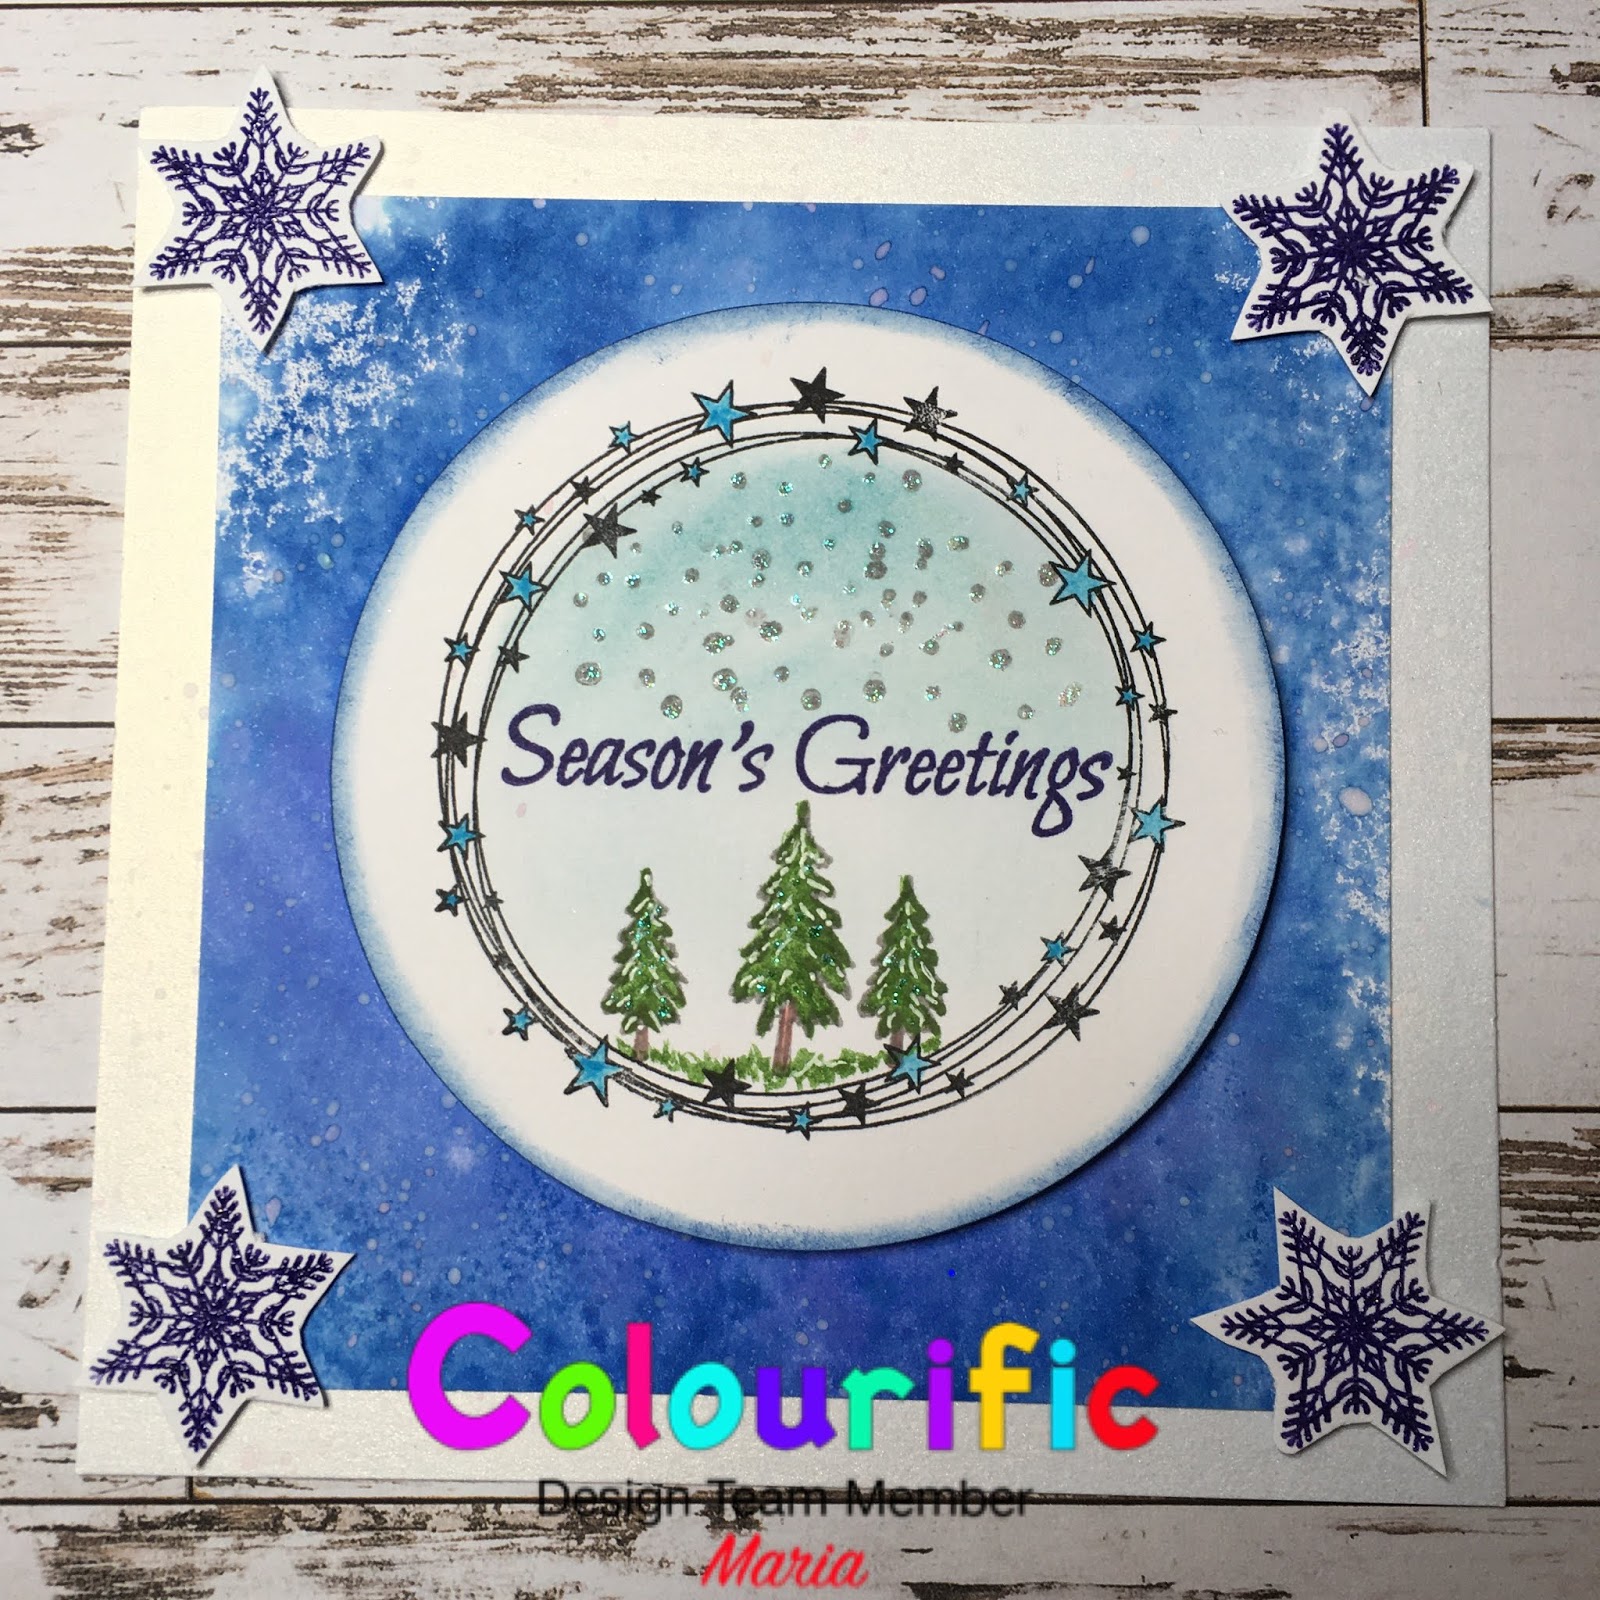
Winter Scene in a Ring

Here’s another card showing you one of the new stamp sets from Colourific.

Here’s what you will need:
A5 Rings stamp set
Winter Wonderland Stamp Set
Distress Inks - any blue - I used Salty Ocean
Watercolour paints or pencils
Clear Embossing Powder
Versafine Onyx Black
Versafine Clare blue
White and blue Gel Pens
Iridescent Glitter Glue
3D Foam pads
6x6” card base
Stamping card
Die cutter - circles or punch

Here’s how I made it;

  1. Cut a piece of 5x5” stamping card.  Stamp the Distress ink onto a blending mat and spritz with water, swish the card through the ink and dry.
  2. On a separate piece of card, stamp the stars ring in black Versafine.  Cut out a circle around this stamp - I used a die cutter or thus or you could use a punch. 
  3. Stamp two small trees, one medium tree and seasons greetings in the circle and colour with watercolour paints or pencils. Add a blue wash for the sky and draw in some grass under the trees.
  4. Stamp some of the small dots for snow and glitter the top of the dots.
  5. Stamp and emboss 4 snowflakes onto a separate piece of card and cut out.
  6. With the white gel pen, colour in some snow on the trees and with the blue gel pen colour in the stars of the ring.
  7. Mat the blue inked background onto the card base and adhere the circle to the middle of the card using 3D Foam pads.
  8. Add the snowflakes to the corners of the blue background using 3D Foam Pads.
Hope you enjoy making this card - the rings are very versatile and can be used as a frame for lots of small stamps and dies.


Tuesday, 15 October 2019

Reindeer in a ring of lights

Hi everybody, here is the Reindeer in the ring of lights card I made for the new stamps launch.
I used the A5 Rings and the Winter Wonderland stamp sets from Colourific.
Here’s what you will need:
A5 Rings Stamps
Winter Wonderland Stamps
Versafine
Clear Embossing Powder
Watercolour Pencils
Multicoloured Fineliners
Distressed Oxides - Peeled Paint
White Stamping card
Black Card
White card blank (I used 7x7”)
Glossy Accents

Here’s how I made it

  1. Stamp the ring of lights in the centre of the stamping card (6x6”) using black Versafine and clear embossing powder.
  2. Stamp the deer and fawn in the centre of the ring and emboss. 
  3. Colour the main deer image in with Watercolour Pencils and the lights on the ring in felt tip pens (I used fineliners).
  4. Draw in some green grass under the Reindeer so that they aren’t floating!
  5. Using the Distress Oxide, blend all round the edge then sprinkle (flick) water on the ink - then blot with kitchen roll to give the white marks.
  6. Mount onto black card (6.5x6.5”) then onto the card blank.
  7. Use Glossy Accents on the fairy lights to make them shine - then let it dry.
  8. Add the sentiments using the black versafine and clear embossing powder, mat and layer onto black card and add to the finished card.
All done - obviously you can play around with images in the rings and change the border colours - have a play.

See ya later!

Friday, 27 September 2019

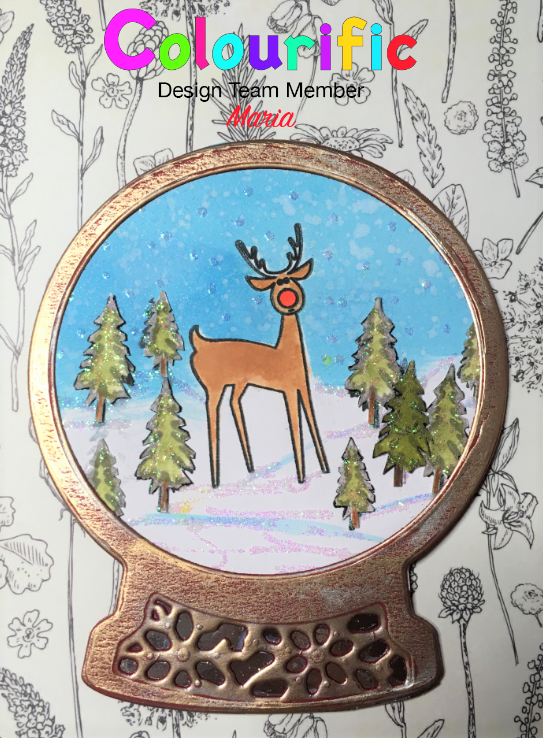
Reindeer in a Snow Globe

Hi everyone, Maria here with another idea for a card using the Winter Wonderland stamp set from Colourific.
Here's what you will need:

A5 Winter Wonderland stamp set
1 sheet red card
1 sheet stamping card
Silver mirror card
Snow globe and circle cutting die
Versafine Onyx Black
Clear Glitter Glue
Water colour paints
Gold Gilding Wax
Paper mask or liquid masking fluid
Water colour paints

Here's How I made it:
1. Die cut 3 Snow Globes in Dark Red card and one in stamping card
2. Die cut 1 circle in the middle of one of the red globes and one in white stamping card.
3. Stamp the image of the reindeer in the centre of the white stamping card circle and mask the reindeer.
4. Watercolour the blue sky, then remove the mask and paint the reindeer.
5. On a separate piece of stamping card, stamp a few of the medium and small Christmas Trees, water colour them in and fussy cut them out.
6. Glue the trees onto the circle and draw in some snow hills using the clear Glitter Glue.  Add some glitter to the trees and dot the sky to give snow.
7. Once dry, stick this circle to one of the red complete snow globes.
8. Add mirror card behind the base of the globe with the cut out circle, then apply the gold Gilding Wax to almost cover the red card.
9. Glue this frame onto the top of the globe with the topper on.
10. On the third snow globe, make a fold 1 cm from the top of the globe and attach this base to the decorated globe by gluing the 1cm at the top of the globe.  This will enable the globe to stand up like a card.

That's it, all done


Friday, 20 September 2019

Gatefold Deer in the Forest

Hi everybody, 
It's Maria here, my turn to show you a card.  I've used the Winter Wonderland stamp set from Colourific to make this lovely gatefold card.
To make this card you will need:
A4 White card
A5 Winter Wonderland Stamp set
Co-ordinating winter backing paper
Die cuts of Reindeer and snowflakes
Distress Oxides for colouring
White Pen
Grey Alcohol pen
Versafine Smokey Grey ink pad
Catherine Pooler Aquatini ink pad
Tacky Glue
Green Sparkly paper/glitter card
Frame Die
Gelly Roll sparkle pen
Black Fineliner

This is how I made it:
1.  Cut a White card base 294mm x 150mm - to make gatefold, score at 73mm and 220mm.
2.  Cut a piece of stamping card 92mm x 135mm and stamp the deer onto the card, then make a mask and cover the image.
3.  Using a blue Distress Oxide ink pad, gently blend the top of the card to show blue sky, fade out towards the bottom 1/4.
4.  Stamp the bare trees using the grey Versafine in the two different sizes and with a grey alcohol pen draw shadows under the trees.
5. Remove the mask from the deer and colour using the different colours of Distress Oxides.  I used a Gelly Roll sparkle pen for the antlers and a fineliner for the nose.  I then coloured the trees and added white pen to highlight areas of the trees.
6.  Blend around the outside of the topper with the Aquatini ink pad.
7.  Cut a piece of the green sparkle paper to 100mm x 143mm and mount the topper onto this.
8.  To make the shaped card base, I folded along the fold marks to make the gatefold shape, I slipped the frame die in the middle, cut side up so that it cuts the front two flaps, then put it through the die cutter.
9.  Next I cut 2 pieces of one backing paper and 1 of the corresponding paper to 5mm smaller than the back panel.  Take one of each paper and die cut a frame in the middle (line up to the card base before you cut). Then cut down the middle so you have 4 pieces.
10.  With the other square backing sheet, blend the edges with the Aquatini ink pad.  Centre and glue the topper to this sheet and glue to the inside of the card blank.
11.  Glue the cut pieces to the front gatefold flaps, leaving a small border on the inside of the cut.  Make sure you put the same pattern on the inside of the flap as the paper on the back panel.
12.  Glue two die cut reindeer to the front two flaps with a snowflake die cut at the top of each gatefold flap.
13.  Finally, add different sized snowflake die cuts to the outside of the topper on the back panel and add Gelly Roll sparkle pen onto the snowflakes.

There you go, all done. It does take a little time but it’s worth it. Don’t forget to give me a shout if you’re stuck.

Friday, 13 September 2019

Forest in Winter

Hi everybody, Maria here.  Today I'm going to show you how to make the Forest in Winter card using the A5 Winter Wonderland Stamp from Colourific.
To make this card you will need:
A5 Winter Wonderland Stamp Set
A5 Blank white card base
A5 Dark Green card
A5 sheets of white card
Onyx Black and Smokey Grey Versafine ink pads
Water colour Pencils
Clear Embossing powder
Gelly Roll Clear Star pen
Distress Oxides - Peeled Paint, Cracked Pistachio and Iced Spruce
Mardi Gras Carnivale Colourburst
Double Sided Tape
3D Glue Gel

This is how I made it:
1. Trim the A5 white card and the dark green card by 1 cm top and bottom so that it fits within the card base leaving a nice border.

2.  To make the background, stamp the three Distress Oxides into a blending mat and spritz with water, swoosh one of the white cards into it and keep doing this until you are happy with the result.  It is good to dry off the card in between the swooshes - you get some lovely effects. After you have done the last swoosh, before drying sprinkle on some of the Mardi Gras Colourburst into the wet ink and give it a spritz with water to make the colour burst.

3.  Let this dry, once dry, stamp the small forest trees randomly all over the sheet.

4.  Take the other sheet of cropped white card a cut 2 diagonal lines from the bottom left corner to either side of the top right corner in a V shape - see card.

5.  Stick this to the green card matching up the sides so that all you can see is the dark green V in the middle.  Trim the green card to 2 mm border of the inside of the white card.  See card. This gives the inside a border.

6.  Stick both these corners to the background sheet you just made, matching up the corners to give you the colourful inset.

7.  Stamp the small dots stamp all over the white triangles in grey Versafine.

8.  Stamp the Winter Wonderland stamp on the edge of the right hand triangle and emboss with clear embossing powder.

9.  Stick this to the A5 card base.

10.  On a separate piece of white card stamp 2 of the large trees and 4 of the medium trees using the black Versafine.  Colour these in - I used watercolour pencils.

11.  Cut out the trees leaving a small white border.  I then used the gelly pen to glitter the snow on the trees.

12.  Arrange the two large trees and attach using 3D glue gel to the bottom left so that it covers the bottom end of the colourful insert, add the other medium tree to the bottom right.

That's it, all done - how I wish I had photographed this one as I made it - it's so hard to explain without pictures.  If you are stuck or struggling to understand please ask and I'll try and explain.  Next time I make another one like this I will do the pictorial step by step.

Bye for now
Maria x

Friday, 16 August 2019

Christmas Deer

Hi everyone, Maria here.  It's Friday which means it's my turn to spread a little Christmas Cheer this week.

I know it's only August but now is the time of year that some of us crafty folk start thinking of Christmas cards.  With that in mind, I have made a start with this card featuring the Christmas Deer and fawn from the Winter Wonderland stamp set from Colourific.


Here is what you will need:

5x5" card base
White stamping card
Brushed Silver card
Blue card
Versamark black inkpad
Clear or White Glitter - I used Nuvo 
Glue pen
Watercolour paints
3d Foam pads
Doublesided Sticky Tape
White gel pen

Here's what I did:

  1. I stamped the image of the deer and fawn on a piece of 3.75 x 3.75" stamping card and placed 4 of the small trees around them.  I also stamped the snow drops in the sky area.
  2. Coloured the images and the sky using watercolour paint.
  3. Using a glue pen I drew the lines where the snow starts/ends, the snow drops, the edges of the tree where the snow would collect and grounded the trees and deer, I then glittered these lines.
  4. I highlighted areas with the white gel pen.
  5. This was then mounted up onto the silver card then the blue card.
  6. Finally, I stamped and glittered the With Love At Christmas sentiment and used a foam pad to adhere it to finish the card.

Hope you enjoy making the card, I'm off to create another one.

See ya later
Maria x

Friday, 26 July 2019

Winter Wonderland Magnet

Fancy a change from making cards?  Here is an idea for a fridge magnet:

Here is what you need:

2.5" diameter MDF circle
White Stamping Card
Winter Wonderland Stamp Set
Versafine ink pad Onxy Black
Alcohol pens
White pen - I used a Uniball Signo
Clear or white Glitter
Dries Clear glue
Glass paper (sandpaper)
Clear varnish or Glossy Accents
Magnet

Here is what I did
  1. Stamp the image of the two deer's on a piece of stamping card and colour in using your favourite preferred colouring tools. 
  2. Underline the characters with glue and glitter to ground them and the border between the sky and snow.
  3. Glue onto the MDF circle and wait until it dries.
  4. Cut out around the circle leaving a millimetre overhanging, use the glass paper to smooth the edges. 
  5. Cover the image with a thin layer of varnish and let this dry.  Top Tip  - Don't try to do this on a hot day - I did and it was not happy!!!!
  6. Outline the edge with glue and glitter.
  7. Attach a magnet onto the back.  I cut some off a self adhesive roll.

Love Life

Good Morning Monday again.  The weather here has been awful, rain, hail, snow, and sunshine all in the one day! Too wet and cold to go out...