Showing posts with label Watercolours. Show all posts

Friday, 27 September 2019

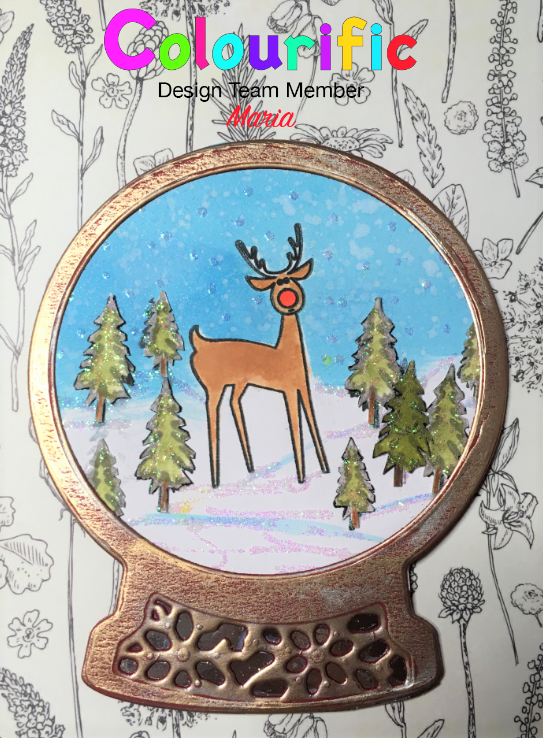
Reindeer in a Snow Globe

Hi everyone, Maria here with another idea for a card using the Winter Wonderland stamp set from Colourific.
Here's what you will need:

A5 Winter Wonderland stamp set
1 sheet red card
1 sheet stamping card
Silver mirror card
Snow globe and circle cutting die
Versafine Onyx Black
Clear Glitter Glue
Water colour paints
Gold Gilding Wax
Paper mask or liquid masking fluid
Water colour paints

Here's How I made it:
1. Die cut 3 Snow Globes in Dark Red card and one in stamping card
2. Die cut 1 circle in the middle of one of the red globes and one in white stamping card.
3. Stamp the image of the reindeer in the centre of the white stamping card circle and mask the reindeer.
4. Watercolour the blue sky, then remove the mask and paint the reindeer.
5. On a separate piece of stamping card, stamp a few of the medium and small Christmas Trees, water colour them in and fussy cut them out.
6. Glue the trees onto the circle and draw in some snow hills using the clear Glitter Glue.  Add some glitter to the trees and dot the sky to give snow.
7. Once dry, stick this circle to one of the red complete snow globes.
8. Add mirror card behind the base of the globe with the cut out circle, then apply the gold Gilding Wax to almost cover the red card.
9. Glue this frame onto the top of the globe with the topper on.
10. On the third snow globe, make a fold 1 cm from the top of the globe and attach this base to the decorated globe by gluing the 1cm at the top of the globe.  This will enable the globe to stand up like a card.

That's it, all done


Friday, 16 August 2019

Christmas Deer

Hi everyone, Maria here.  It's Friday which means it's my turn to spread a little Christmas Cheer this week.

I know it's only August but now is the time of year that some of us crafty folk start thinking of Christmas cards.  With that in mind, I have made a start with this card featuring the Christmas Deer and fawn from the Winter Wonderland stamp set from Colourific.


Here is what you will need:

5x5" card base
White stamping card
Brushed Silver card
Blue card
Versamark black inkpad
Clear or White Glitter - I used Nuvo 
Glue pen
Watercolour paints
3d Foam pads
Doublesided Sticky Tape
White gel pen

Here's what I did:

  1. I stamped the image of the deer and fawn on a piece of 3.75 x 3.75" stamping card and placed 4 of the small trees around them.  I also stamped the snow drops in the sky area.
  2. Coloured the images and the sky using watercolour paint.
  3. Using a glue pen I drew the lines where the snow starts/ends, the snow drops, the edges of the tree where the snow would collect and grounded the trees and deer, I then glittered these lines.
  4. I highlighted areas with the white gel pen.
  5. This was then mounted up onto the silver card then the blue card.
  6. Finally, I stamped and glittered the With Love At Christmas sentiment and used a foam pad to adhere it to finish the card.

Hope you enjoy making the card, I'm off to create another one.

See ya later
Maria x

Friday, 9 August 2019

Time for a Road trip

21 today - time for a road trip

21 today, time for a road trip 😁.
https://drive.google.com/uc?export=view&id=1nUezl4vOAvcFtnmh0OEEHx7GGjsI8pOZ
To make this card you will need:
Campervan stamp from Colourific
Catherine Pooler mini ink set - Life of the party
Watercolour paints
Versafine Black Onyx
Clear Embossing powderBubble wrapWhite Signa penGlossy accentsStamping cardBlending toolsBlack and yellow card for mounting3D foam padsGems
Here’s how to make it:
Stamp and emboss the Campervan image onto stamping card using the versafine ink pad and clear embossing power.
Using the inks and watercolours paint  in the Campervan.  Once dry highlight areas with the white pen and add Glossy Accents to the headlights.
For the background I blended the red and yellow inks and stamped some bubble wrap in red ink over parts of the background.  Then using the versafine I added a blended border to the outside edge of the background.
Then stamp 3 of the rose heads, stems and leaves to the top corner.
Mount the Campervan onto bottom left of the card using 3D foam pads and attach the ‘21 Today’ sentiment.
Add gems to the corners of the background.
Finish off by mounting onto white, black and yellow card.
There you are, all done and ready for taking a year out and enjoying your trip around the world - IN MY DREAMS 😁. Hope you like it.


Saturday, 20 July 2019

Inked Blossom - A6 Blossom Stamp Set

Hi Everyone

Alice here.  Welcome to my blog post for today.  I have used the A5 Blossom and Grow Stamp set again.  You can find this and many more fabulous stamps on the Colourific Website here

Materials Used:

A6 Blossom and Grow Stamp Set
A6 Borders Stamps
6x6 Card Blank
5.75 x 5.76 Light Blue Card
5.5 x 5.5 Pink Card
5.25 x 5.25 White Card
Black Embossing Powder
Black Versa fine Ink Pad
Blue and Pink Watercolours


  • Matted and layered Light Blue and Pink cards onto with card blank
  • Lightly sprayed the White Mat with Water and added pink and blue water colours.  Sprayed again with water and let paint run over the card.  Left to dry naturally.
  • Stamped the Blossom onto the card and added the little stamps and stems at the bottom, then embossed with Black Powder.  Then added pink watercolour to the blossom head.
  • Added the Border stamp along the top and left hand side.
  • Stamped Blossom and Grow greeting in the bottom left hand corner.
  • Finished off with 3 gems.

Thank you for looking


Wednesday, 10 July 2019

Marleen DT - Watercolour Peonies

Hello Everyone.

I'm Marleen and today I wanna share my first post since returning to the design team for
Colourific

I was on the DT last year but took a break from crafting and Annelies has been so kind to offer me to return to the team. Many thanks Annelies, I'm delighted to be back x


 This card is a simple stamping and masking technique.
I started by stamping the (red) flower in the corner. I then re-stamped the flower onto a post-it-note and cut it out. Adding the post-it-note over the flower I then stamped the (pink) flower in the other corner and finished with the (orange) flower above. I made post-it-note masks for all the flowers and stamped the leaves .

Then it was a simple matter of stamping my greeting and colouring in. I tend to use water colours or water colour pencils for my colouring and that's what I used here.

A very simple card but rather effective.

I used the flowers from the - A5 Peonies stamp set
and the sentiment is from the - A6 Princess Text set.

And that is it from me for today.
Thank you for popping by and for any comments left behind.
Don't forget to come visit me on FaceBook, Twitter, Instagram, Pinterest, Youtube or my FB page.
 Happy Crafting

Thursday, 13 June 2019

It's Christmas....

Hi there Jan here today

This week I have been playing with the amazing Christmas Mini Stamps
I had oodles of fun as you can see below

I started of by making a card and a matching bauble tag
I masked of an area and used Distress Oxides, with some splashes of water and white paint
I stamped the images to make a scene and coloured up using Distress Inks
You need to look carefully for the snowy, starry sky

*****
My second project were a couple of quick tags /toppers
Oxide background with some random stencils and some more cute stamps

*****
My third project some ATCoins, a big love of mine to make
Again Oxide backgound and then using the amazing Mini stamps that were painted  - I finished of these makes using Nuvo Drops

*****

My final project for this week is some mini cards with matching envelopes, these would be perfect for the children to colour in and give to there friends , there are so many stamps in this set (29!!) that each card could be different


My other idea for these stamps would be an advent box with a little drawer with a stamp on each, plenty to choose from , I ran out of time this week but maybe a project for the future 
Thank you for looking today and don't forget to check out those 

Thursday, 16 May 2019

Say it with Flowers

Hi there Jan here, super, super excited to be joining the Colourific Team
The stamps are amazing 
This week I have been playing with 
**Say it with Flowers **
Amazing ..... A total of 8 stamps on this set
You soooooooooo must check it out ~ find them in the store here

For my first project this week I made a card, with a matching tag and a gift bag
I think they look so pretty
I used some water colour paints on the flower heads and leafs
I used Nuvo drops Gloss -Ebony Black & Carnation Pink on the popping flowers , they look so shiny and lush  in real life


For My second project I made some sweet little notelets
This is one of my favourite flowers ever, I know it will certainly be used lots!
Again using water colour paints on the leafs and Nuvo drops on the flowers 
Matching cardstock , some very usefull notelets for many occassions


Don't forget to follow our blog , making sure you won't miss any of our posts with new release stamps etc

Thank you for stopping by today
xx

Saturday, 27 October 2018

Soft watercolour Christmas Card - DT Member: Verity


Hello! So good to be here. It's Verity here from Pretty Little Button with another card for you today. Today is my first post using the lovely Christmas stamps by Colourific. The Peace & Joy stamp set has a lovely collection of baubles which I used for this card today.  


Soft watercolour Christmas Card details:

To start off stamp the baubles in clear versamark in and heat emboss in metallic embossing powder. Alternatively, to get the foiled look like I have, either use Bonding powder from WOW! embossing powders, or a sticky glue pad. Once these are heat set or dry, you can run this through a laminator or Minc machine with foil. 


 Next, using a selection of watercolours, colour in your baubles. The embossing powder or foil will resist the watercolour, so you just need to make sure you don't go outside the bauble itself.


When completely dry, fussy cut the baubles out and put to one side. For the background, trim a piece of white card down 1/2 smaller than your card base. I went for a 6" square card base. You can use watercolour paper, but I wanted white card. As I wasn't planning on using a lot of water, I just made sure I used a heavier weight white card. 


Apply some clear water to an area of the card panel and drop in colours for a lose watercolour background. When dry, foam mounts the baubles onto the front, making sure you attach a small piece of thread to the back of them. Attach the other end of the thread to the top back of the card panel to give the illusion of hanging baubles. 


I added a stamped sentiment from stamp set coming soon and embellished with a few platinum nuvo drops. 


I hope you love today's card and don't forget to check out the stamp set, link below. If you loved this card please leave a comment below as we would love to hear from you. 


Until next time!

Verity


Saturday, 13 October 2018

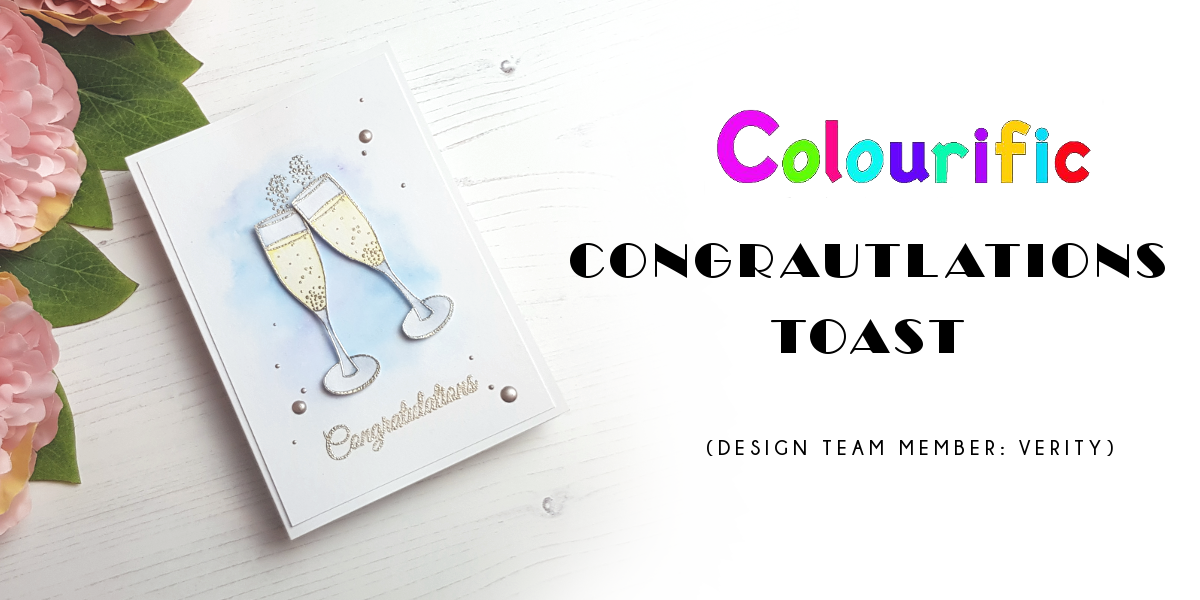
Congratulations Toast - Design Team Member: Verity


Hello! So good to be here. It's Verity here from Pretty Little Button with another card for you today. This card was one of the first cards I made when I received the lovely stamps from Colourific. However, I am only just getting around to showing you it today. This card is very easy to make and the stamps from Colourific do all the talking on this card!


Congratulations Toast card details:

To start, heat emboss in platinum embossing powder two champagne glasses onto white card. These were coloured in with watercolour paints, but I did not use watercolour paper. The amount of water used was very small so I was able to get away with just using the regular white card. Watercolour paper isn't a true white, which I wanted for the card, so this I why I did not use watercolour paper. If you prefer to, you can do this just as well with watercolour paper. 

Handmade congratulations toast card made by Verity Biddlecombe

I only used a couple of colours for this card, using a blue-grey for the glass and a light yellow for the liquid. I didn't do any fancy shading and wanted to keep it simple. These were fussy-cut out once dry.


For the background, I added clear water to a white card panel and dropped in a selection of blues allowing them to blend on their own. I did not add the colours close to the edge of the water on the card in order to get a soft fadeout.

The panel was adhered to a white card base and the glasses foam mounted on top. There is a little 'bubbles/fizz' stamp in the stamp set which I heat embossed directly onto the card panel above the glasses, along with a sentiment beneath. 


The card was finished with a few platinum Nuvo drops as embellishments. 


I hope you love today's card and don't forget to check out the stamp set, link below. If you loved this card please leave a comment below as we would love to hear from you. 


Until next time!

Verity


Pretty Little Button Blog | Instagram | Facebook | Youtube


Saturday, 29 September 2018

Birthday Unicorn - Design Team Member: Verity


Hello! So good to be here. It's Verity here from Pretty Little Button with another card for you today. When I was colouring in the Unicorn from the A5 Unicorns and Chasing Rainbows clear stamp set I knew straight away this would make a perfect birthday card for a little girl. I decided to play on the theme of pinks and purples but added a touch of grey to modernise it. This is a great card to have in my stash ready to send out, you should make one too!

Birthday Unicorn card details:

To start off, stamp the unicorn onto hot press watercolour paper in versamark ink and heat emboss. I used Pure Platinum WOW! Embossing powder as this would pair lovely with the colour scheme of the card. 

Unicorn birthday card handmade by Verity Biddlecombe

Next, I used my Tropical watercolour pan from Prima marketing to colour the unicorn in.  I added more colour to areas in the shadow to add some dimension and depth. I also used a soft grey ink to add a little shading around the edge of the horse head. 


To add sparkle to the unicorn I added versamark ink with the use of the versamark pen and add holographic embossing powder, and heat set this. Once the unicorn was complete, this was fussy cut-out. 

For the rest of the card, I die cut a stitched circle out of purple card. For added interest, I clear heat embossed the A6 Tiny flower background clear stamp. Before foam mounting this onto the card, I used soft stencil brushes to ink blend Tattered Rose distress oxide onto the card panel. I wanted a soft pink haze around the die cut circle. 


I cut down a few grey strips of card and adhered this onto the card panel with double-sided tape. Both the die cut circle and then the unicorn was foam mounted onto the card to give lots of dimensions. A grey die cut sentiment was added to the card along with a small stamped sentiment in matching ink. 


To finish the card off, a selection of purple and pink sequins were added to the card panel. 


I hope you love today's card and don't forget to check out the stamp set, link below. If you loved this card please leave a comment below as we would love to hear from you. 


Until next time!

Verity


Pretty Little Button Blog | Instagram | Facebook | Youtube


Love Life

Good Morning Monday again.  The weather here has been awful, rain, hail, snow, and sunshine all in the one day! Too wet and cold to go out...