Saturday, 15 September 2018

Custom stamped backgrounds with small stamps - DT Member Verity (Video Tutorial)


Hello! So good to be here. It's Verity here from Pretty Little Button with another card for you today. Whatsmore, this post also features a video tutorial showing you how these cards were made. For these cards, I used a selection of stamps from the A6 Marquise petal and circular clear stamp set from Colourific. These stamps can be used in a variety of combinations to create some unique and funky flowers for your cards. However, today I am showing you how to get more out of the stamps and use these small stamps to create custom stamped backgrounds. I combined this with an emboss resist technique to create a gradient coloured background - perfect backgrounds for your sentiments to pop from. So, hit play and see just how easy they are to make!

Custom stamped backgrounds with small stamp video tutorial:


Custom stamped backgrounds with small stamp photos:


I hope you love today's cards and don't forget to check out the stamp set, link below. If you loved this card please leave a comment below as we would love to hear from you. Also, if you loved this video, please subscribe to my channel, your support continues to motivate me to inspire you all!


Until next time!

Verity


Pretty Little Button Blog | Instagram | Facebook | Youtube


Thursday, 13 September 2018

DT Marleen - Background stamps on small hearts..

Hello Beautiful People

Its once again my turn to share a bit of inspiration for
Colourific.

For todays creation I've used 3 different background stamps.
Ive used:
A6 Flower Background
A6 Tiny hearts Background
A6 Grunge BackgroundA6 Princess text

All clear stamps.

I love strecthing my supplies a bit further, using them in different ways, so for todays card I stamped each background stamp, on seperate pieces of cards, in complementry colours and used a punch to cut a load of hearts from each . I added a bit of distress ink around the edges of each heart and around my card blank before sticking the hearts down.
I drew a couple of faint pencil lines down the card to try and keep the hearts strait, and I just rubbed them out once the hearts was stuck down with foam pads.

I finished the card with my greeting and a few clear nuvo drops. I stamped the greeting using my Misty, nit a must but I find it helps me so much getting things strait as I can test it before I commit.
  And that is all for today.
Thank you for popping by and for any comments left behind.
Dont forget to come visit me on FaceBook, Twitter, Instagram, Pinterest, Youtube or my FB page.
 Happy Crafting


Tuesday, 11 September 2018

Flutter by Butterfly ~ Design team member ~ Aly

Hi there, my turn to blog today, here I have used a large MDF tag. 
I used watercolour card and created a washed out background using watercolour brush pens, I have then stamped on of the flowers from the A6 Moderne Flowers stamp set in various pastel shades. I've glued this onto the tag then tied twine randomly around the tag.
I have stamped out 2 butterflies from the A5 Butterflies Take Flight stamp set and water coloured them with brush markers and added some gems.
Hope you like and will have a go at making a tag yourself


tag made using two butterflies handmade by Crafty Aly Sheridan

Hope you like see you soon
Hugs


Sunday, 9 September 2018

Stamping and Embossing


Hi everyone! Monica here sharing my first creation as a Colourific DT.  I am looking forward to a great term here and hope to keep everyone inspired!  Today I chose to use the "Butterflies Take Flight" A5 clear stamp set.  What a beauty this!

I stamped my images on Arches watercolor paper using a versamark ink and black embossing powder.  Once done I then fussy cut my butterflies out and colored them with zig clean color brush pens.  Which gives them a fun bright look.

To give my card some added depth I embossed the cardstock and finished it off with some sequins!
Well, I hope everyone enjoyed my post and thanks so much for stopping by...


Friday, 7 September 2018

Unicorn Eating Cake on a Rainbow ~ Karen

Hello!  It's Karen here with you today, and I am so happy to be here, doing my first post for Colourific!  I am using the smaller unicorn image from Unicorns & Chasing Rainbows, along with sentiments from Unicorn Text:

I started creating my background by blending four colours of Distress Oxide Ink to provide a soft halo of colour.  Then I used my sewing machine to stitch around the panel before adhering it to the base. I've coloured the unicorn and flowers with Copic markers, and fussy cut them all out.
The unicorn and a couple of the smaller flowers are attached with pop dots for a little added dimension, and a few sequins provided some sparkle!
I used another one of the sentiments from Unicorn Text on the inside, along with the small flower spray:
We are just getting this party started here on the Colourific Stamps blog - be sure to visit regularly to see what our fabulous design team has to share.  You can also find Colourific on facebook here, and you'll want to join our Colourific Stamps Fan Group here, where you can share your creations as well.


Thursday, 6 September 2018

Marleen DT - Butterfly and distress ink tecnique.

Hello Beautiful People..


Today is my very first post for a brand new design team I have been invited to join.
Colourific

I am super excited to join the team, and look forward to share all my creations.
The stamps are made from clear photopolymer and are really easy and nice to work with. I found they stamped perfect from very first try.

This card is made on water colour card stock as I had a play with distress ink and water. I added distress ink strait to my acrylic block and spraid it with water. I then put my card stock over the acrylic block and let the colour seep into the card for a few seconds before removing the card again. I let the card to air dry.
While the card was drying I stamped my butterfly from the "Butterflies take flight" stamp set.
I used the distress ink left on my acrylic block to colour in my butterfly. I just used a water paint brush to mop up the colour..

Then it was time to assemble my card. I used my Misty to add the sentiment, also from the "butterflies take flight". I fuzzy cut my butterfly and shaped the wings a bit and glued her onto the card. And I finished with a few gems..

And Voila, thats it. First card of many made.
I hope you will check out the BRAND NEW stamp release from Colourific and do let me know if the comment section if I have inspired you to try out the stamps or the tecnique Ive used.
  Thank you for popping by and for any comments left behind.
Dont forget to come visit me on FaceBook, Twitter, Instagram, Pinterest, Youtube or my FB page.
 Happy Crafting


Wednesday, 5 September 2018

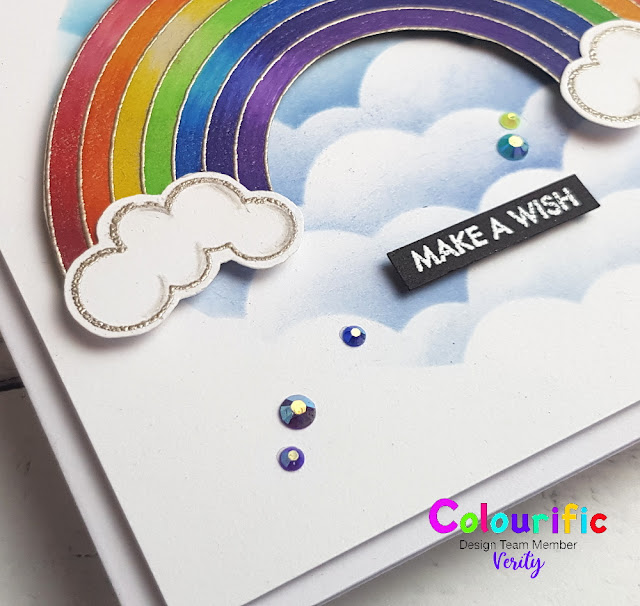
Make a wish on a rainbow card - Design team member: Verity


Make a wish on a rainbow handmade by Verity Biddlecombe


Hello! So good to be here. It's Verity here from Pretty Little Button with my first post for Colourific.co.uk! Colourific stamps has some great stamps to choose from, check out the link at the end of the post to visit the shop. Today's card is a lovely bright happy card using the A5 Unicorns & Chasing Rainbow set from Colourific.co.uk. I thought this card would be perfect for anyone who loves a rainbow and let's be honest who doesn't?! Or a great child's birthday card! I googled if you can make a wish on a rainbow. Apparently, when you see a rainbow, you should draw a cross on the ground and then you can make a wish on the rainbow!


Make a wish on a rainbow details:


To start off, stamp with versamark ink onto paper that has some tooth too it, as this was coloured in with pencils. Alternatively, you could colour this with alcohol markers or watercolours, but just make sure you use the right paper. I used Strathmore tone grey paper for this as I love how the pencil goes down onto this paper. 


To create a little interest to the rainbow, I used a slightly darker shade towards the end of each stripe of the rainbow and added a light area/highlight to the left side of the arch. Make sure you start of lightly applying the colour so you can add layers and blend between the shades. 


Once the rainbow was coloured, I stamped over it again using my stamping platform to heat emboss the lines. You can leave it without this stage if you prefer. Just using a simple pair of scissor I fussy cut the rainbow out. 


To make the rest of the card, I die cut circle out of scrap paper and use the negative to adhere to my card panel to create a mask. Using a cloud edge die from my stash to create a temporary stencil, I ink blended Salty ocean distress oxide and Faded jeans distress oxide of the stencil to create the background.


The rainbow was foam mounted onto the card. I also stamped and heat embossed two clouds from the stamp set, and added a little shading with pencils. These were added to the bottom of the rainbow. To finish, I added a small heat embossed sentiment from my craft stash and added a few rainbow jewels with glossy accents. 


I hope you love today's card and don't forget to check out the stamp set, link below. If you loved this card please leave a comment below as we would love to hear from you. 


Until next time!

Verity


Pretty Little Button Blog | Instagram | Facebook | Youtube

Love Life

Good Morning Monday again.  The weather here has been awful, rain, hail, snow, and sunshine all in the one day! Too wet and cold to go out...